


")


Our recent report on firelapping in the June 2012 edition ended with a note that the process can also be applied to 22 rimfires, but we had not yet tried that. Soon after publication of our report, reader John B. sent us an email wondering if we were interested in firelapping his old 22 rifle. John had an ancient Marlin lever-action 22 that no longer shot well, he said. He offered to send it to our Idaho office to see if we could resurrect its bore. We had just experienced a disaster testing a modern Marlin 39A (August 2012). We thought this would be a good opportunity to examine an old Marlin to see what they used to be, and maybe we could even help its bad old bore. We were having fits trying to get publishable results firelapping any of the 22 firearms we had on hand. They were in excellent condition, and we were stymied trying to make excellent guns shoot even better. We decided to give Johns questionable 22 a shot, so to speak, and asked him to send it along.
The little Marlin had been used by Johns parents in the 1930s, so we knew it was plenty old. Yet when the rifle arrived we were somewhat astounded at what we found in the box. The first thing we noticed was that it was a Model 1897, and therefore made before 1921. The second thing we noticed was it was in generally excellent condition, a collectors gem, in fact. Senior Technical Editor Ray Ordorica was drooling so badly he could hardly talk. Product Coordinator Joe Syczylo kept upping his estimate every minute of what the rifle was worth.
The rifle was in original condition, with original spring-style rear sight and dovetailed, contoured front bead made of what appeared to be German silver. The rifle had a case-colored receiver with about 80 percent of the original color remaining overall, and nearly 100 percent on the left side and top of the receiver. Most of the original rust bluing on the tapered octagonal barrel was intact, with only slight age frosting here and there, just minor blemishes. The wood had a black spot on the right side as from a hand print that had held ink or black paint, and a corresponding black thumb mark on the left wrist. The rest of the wood retained the original varnish, which was in excellent condition. The hard-rubber buttplate was original and in near perfect condition. It had Marlin Safety in a circle around the central portion that read MFACo. The octagonal barrel was 24 inches long, tapering from 0.780 inch at the breech to 0.580 inch at the muzzle. It was a joy to look down the length of each flat on the barrel and see no machine marks, no waviness, just a smooth flat surface that defied us to figure how it was made, so long ago, with such wonderful precision. The rifle weighed 5.9 pounds, and balanced like a fine instrument, thanks to that tapered octagonal barrel.
With the rifle safely in our vault we called a friend who knew something about older Marlins and found out we had been way low in our estimates. He looked it up in a reference book, and from our comparing notes, we placed a value on this old Marlin of at least $1500 and possibly as much as $2500.
All the mechanics of the old rifle worked perfectly. The lever was crisp and clean in its operation. The takedown screw didnt have a slot. It was knurled and worked easily and held the gun tightly together. Takedown was similar to the modern Marlin, but easier, better, and much faster. Spin out the knurled knob, hold the hammer far enough back to clear the end of the bolt, and tap the rifle apart. Slide out the bolt just like on a modern Marlin, and then instead of fumbling with two screwdrivers, simply pull out the V-shaped unit that is the ejector with its attached spring. The firing pin can fall out of the bolt, so make sure you dont lose it. With the gun apart you ended up with five pieces, not three as with the modern gun, but we much preferred the old design. All the innards were in excellent condition with no traces of rust or pitting. The inletting was just superb everywhere. All the parts inside and out were machined, and examining this old rifle was a great experience for the student of guns. This, we thought, was a Marlin worthy of the name.
The bore, which was the key to this operation, showed minor pitting, most of it at the breech end. Some early 22 ammo was corrosive, and before that it was loaded with blackpowder, so its no reflection on the current owner that the bore had been somewhat damaged over time. The first thing we did was clean the entire gun, and then used lots of Hoppes No. 9 with a new brass bristle brush on the bore, making sure it went completely through the bore before reversing. Hoppes does a fine job fighting old rust and it was our choice for all the cleaning done on this rifle.
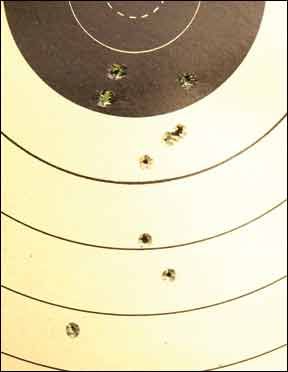
After the bore was as clean as we could get it, we fired two groups with CB Longs from a 25-yard seated position, to get some idea of how bad it was. These went into 1.4 and 1.2 inches, which we thought was not too bad. In fact we wondered if we would be able to improve on that. The owner told us his groups had been in the neighborhood of 10 inches at 50 yards with random low-cost ammo. With a clean barrel and no other work, we were already at the 2.5-inch range (at 50 yards) with our first shots. We cleaned the barrel again and got some lead out. We suspected the entire problem was that the rough bore would pick up lead quickly, so the rifle would not be able to shoot well for very long. In fact that was the case, and what we set out to fix.
The thing to understand is that 22 rimfire firearms, and any guns using lead bullets for that matter, fail to make good groups because the bullets leave bits of lead behind in the bore, which makes the bullet unbalanced, so it flies erratically, resulting in flyers, sometimes drastic flyers, and bad groups. Eliminate the scraping off of lead and the groups improve. So we had hopes that a suitable amount of lapping would grind down the high spots in the Marlins bore, shine up the good areas in between, and let us shoot more than just a handful of shots before the groups went south.
With the bore clean we began our process, using Beartooth Bullets 320-grit compound rubbed with our fingers onto CCI CB Longs, the excess wiped off with paper towels. We fired five of these and cleaned the bore thoroughly. We fired a few more and cleaned the bore again. We ended up cleaning the bore some 15 or 20 times along our firelapping way. Each time it got easier to clean, so we knew we were doing some good.
After 35 rounds of firelapping, cleaning the bore every five to eight shots, we decided to try the gun for group with decent target ammo at 50 yards. In light of the age of the rifle, we thought it was best to keep high-speed ammunition out of it. We stuck with standard-velocity Long Rifle ammo, mostly of a target type. Eley Match EPS and CCI Green-Tag were our favorites, and we also tried Eley Tenex. Our first group measured 2.1 inches for 10 shots. That was not bad, we thought, given that it was hard to get a consistent sight picture with the ancient sights, and the fact that the trigger pull was very heavy, about 9 pounds. Our second group was about the same size, but then they got bigger, telling us we were not done lapping yet. The still-rough bore was picking up lead, causing our groups to enlarge.
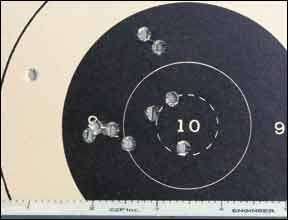
We cleaned lots of lead out of the bore and went back to work. We had noticed progressively less rust coloration coming out of the bore each time we cleaned it. Finally, we saw patches coming out with little or no rust coloration. We ended up putting 20 more fire-lap rounds through the rifle for a total of 55, cleaning along the way, and then decided to test it again. This time our groups were no smaller, but stayed small through the firing of 70 rounds of a variety of ammo, including CCI CB Longs, CCI 22 HP Shorts, Eley Tenex, and CCI Green Tag. All these made 10-shot groups of around 2 inches or slightly larger at 50 yards. At the end of that session, with no cleaning, we fired a 50-yard group of ten CCI Green Tags into a group that measured just under three inches high and two inches wide. That, we thought, was not bad. We decided we had done enough and didnt need to take away any more of the rifling.
We expect the rifle to continue to shoot well, and if its regularly exercised and cleaned, we believe its shooting qualities could even improve. It was gratifying to be able to bring back some of the glory that this ancient little warrior must have had about a hundred years ago. This is a rifle – except possibly for its trigger pull – that Annie Oakley would have been proud to own.
Written and photographed by Ray Ordorica. GT


