


")


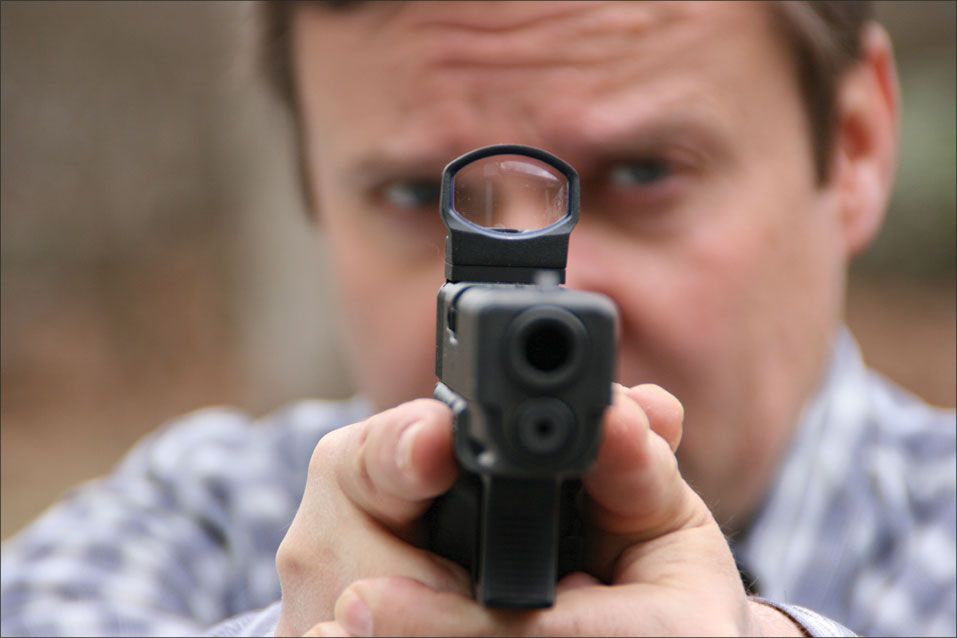
Adding a red-dot reflex sight to a carry pistol has pros and cons. First, the cons. The total cost of the weapon system nearly doubles as the sights are almost as expensive as the pistol, the sights have a larger footprint than the typical rear sight, battery life must be monitored, and foul weather can diminish the capability of the sight. The pros are the sights offer faster target acquisition and ease of aiming. The ability to shoot faster and more accurately in situations under 25 yards are strong reasons to make the switch from iron sights to a reflex sight, so we wanted to investigate mounting a reflex sight on a pistol to see how a reflex sight would work on a carry gun. We chose a Glock 20 Gen 4 as our test platform for two reasons. Glocks are popular pistols among LE and civilians and because the G20 is chambered in 10mm, which has comparable power to a 41 Magnum. We wanted to rattle the innards of these tiny sights to see if anything would fall out, get loose, or go out of zero. Even though the G20 is a full-size pistol, we have found that with the proper holster, like those from Bravo Concealment, and a concealing garment, the G20 can be invisible to the untrained eye.
A reflex sight allows an operator to keep both eyes open and view a target through a small curved glass lens, which has a reticle projected onto it. A light-emitting diode projects a red dot, amber chevron, or other aiming point, giving the operator an unlimited field of view since there is no magnification and the aiming point projects out to infinity. This means that parallax will not affect sighting; place the aiming point on a target, and if zeroed properly, the target will be hit.
Think of them as mini heads-up displays for your pistol.

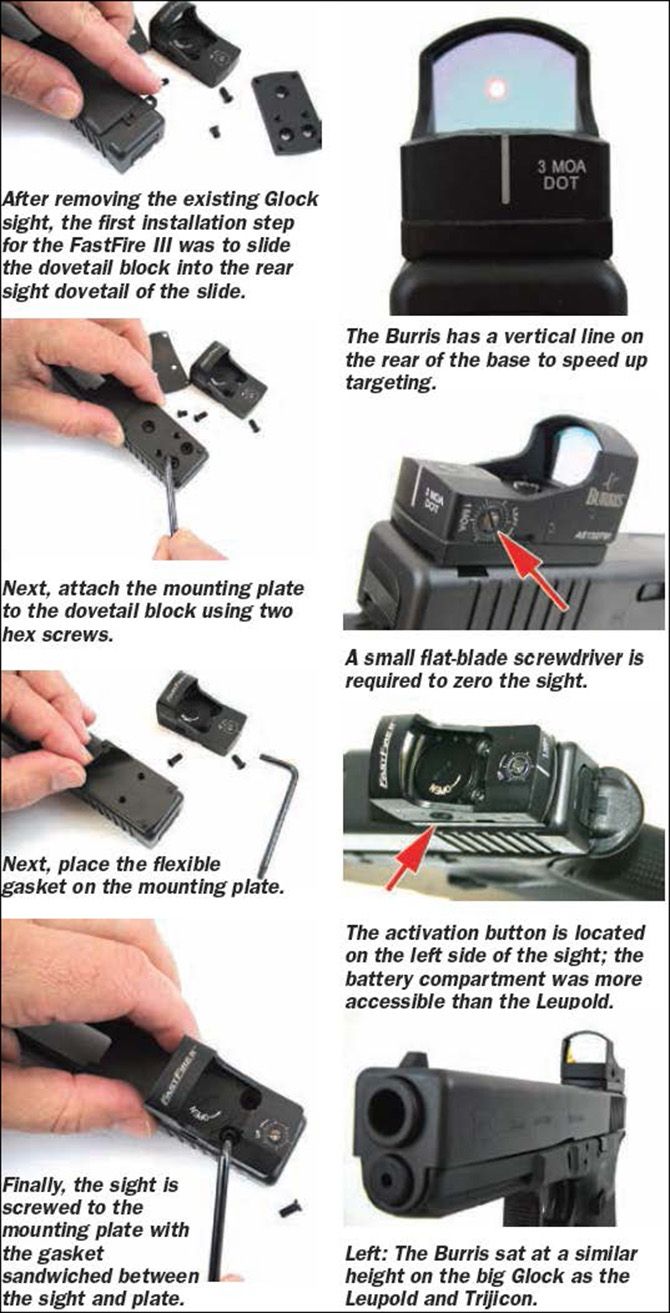
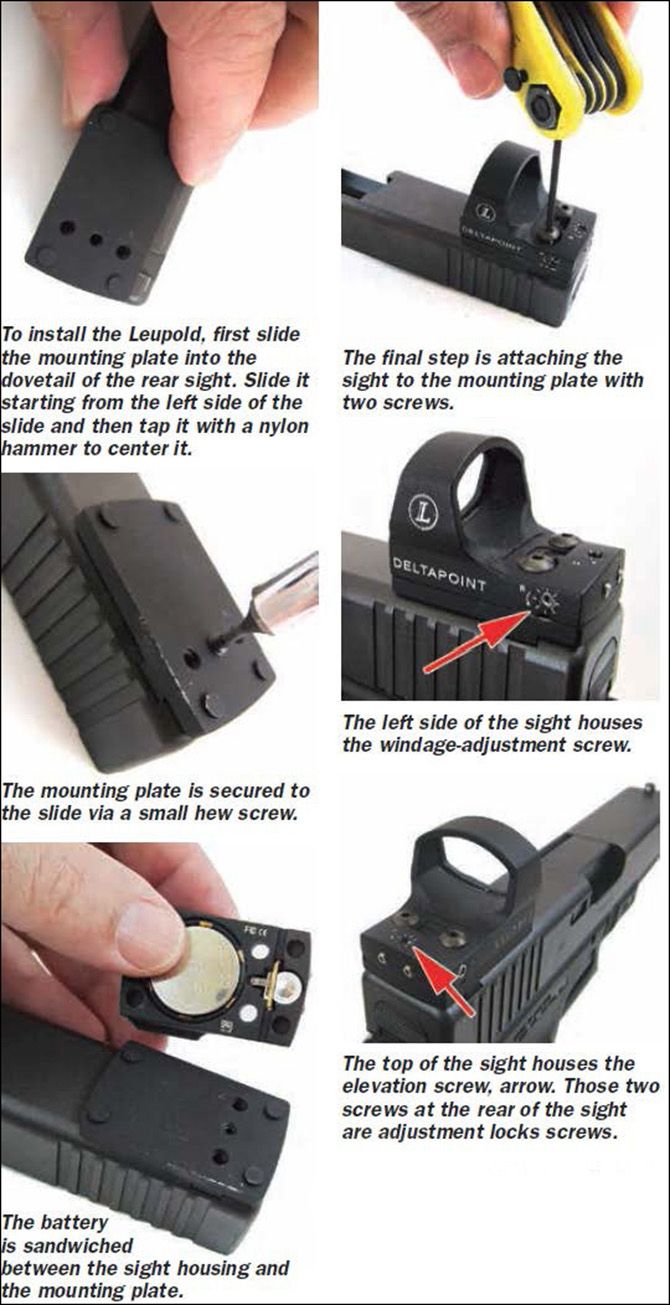
There are two ways to attach the sight to a pistol. One option is to mill an area near the rear sight on the slide and drill and tap it to mount the sight. This option allows the user to also keep iron sights as back ups and it places the reflex sight closer to the bores center axis. In this configuration, the iron sights are taller – like those used with a suppressor – so they clear the reflex sight. Some mount the rear BUIS in front of the reflex sight, others behind the reflex sight. The second method of attachment is to use the rear sight dovetail with a mounting plate. We chose the second option because it was less expensive, and we wanted to be able to mount the reflex ourselves. The tools needed to the mount the sight, other than the ones included with each sight, were a hammer and brass punch.
All three sight packages consisted of the sight and a mounting plate. The underside of the Leupold allowed access to the battery. The Burris had a small cap on the topside. The Trijicon does not use a battery for its power source. With the sight and mounting plate sandwiched together, a seal was formed to keep out debris and moisture.
With all three sights operating, we looked at them in dim and bright light outdoors and indoors, examining each sight side-by-side for clarity, resolution, and brightness. The Trijicon had a greenish tint to the lens that is used to make the aiming point more reflective. The Burris also had a slight tint to it, but the Leupold was clear. Looking at the sights from the business end, the Trijicon and Burris both had a yellowish-red tint much like mirrored sunglasses. The Leupold was clear. All were susceptible to a light signature since the light-emitting diode is on, and if the sight is angled a certain way, a telltale pinpoint of a red dot could be seen from the Leupold and Burris. The amber light from the Trijicon was harder to pick up from across a dark room. Like all optics, there was a reflection from the lenses when a bright light was shined on them. We used an Extreme Beam M4 Scirrako and SX21R Ballistic light equipped with a white light and green light, respectively. The Trijicon was quite noticeable, then the Burris, while the Leupold was least noticeable. We also dropped the sights into wet snow for 15 minutes, then we blew them off. All sights worked even though they were wet. Droplets of water formed on the lens of all sights, and the sights were usable even with the droplets. We then brought them inside to a temperature of about 68 degrees. None of the sights fogged when we brought them inside. The drop test from 4 feet onto a wood floor showed no adverse effects.
Next, we attached the sights to the Glock, noting the effort and tools required. More on this later. Leupold sells a DeltaPoint bore sight, but we benched the pistol, fired three rounds and adjusted the aiming point to the holes. At the range, we pounded the sights using a variety of ammo: PMC 200-grain FMJ-TC, Hornady 165-grain FTX, Buffalo Bore 180-grain JHP, and American Eagle 180-grain FMJ. These rounds offered a variety of bullets and muzzle velocities, from the mild American Eagle to the hot Buffalo Bore. Hands down, the red-dot sights were faster to acquire than open sights. Place the dot on the target, press the trigger, hole in target. Simple. There was, however, a learning curve to find the aiming point in the sight window. At the beginning, it took time. The pistol needed to be held slightly lower than when using the open sights. Ramp up time was short, but a switch to the reflex sight will require training to become more acclimated to the sight. Also, since the sight is attached directly to the slide, the sight does whatever the slide does. The sights being parallax free meant that the aiming point did not need to be centered within the sight window. We fired the sights with the dot not centered to see if parallax had any effect, and for the distance tested out to 25 yards, there were no issues. The accuracy was more than adequate for action-shooting competition and defensive purposes. These sights are made to be mounted and zeroed with no in-the-field adjustments, but we did shoot, move the sight to the right a few clicks or turns, then clicks to the left, then back to the right to test the accuracy of the adjustment system. All were within factory spec and to our satisfaction.

Those turkey and deer hunters in the group thought that any of the sights would be well suited on a shotgun or slug gun. The lenses all need to be cleaned like any optic lens. We looked at power sources, too, and how easy they were to maintain.
We also carried concealed with the sights. Since it was winter when we started testing, a coat easily concealed the big Glock. We used two holsters from Bravo Concealment (BravoConcealment.com): the Patriot has a 10-degree cant, medium sweat guard, and is made from .08-inch-thick Kydex. The DOS is an inside-the-waistband holster made of .06-inch-thick Kydex. As the outside temperature increased and heavy coats were shed, we still could conceal the set up. Many testers like Kydex because the holster mouth stays open making reholstering easier. Also, they are light weight and are built like a tank. The Bravo Concealment holsters exceeded our expectations. Here are further details on each sight.
Trijicon Dual IlluminatedRMR #RM04, $577
What separated the Trijicon RMR (Rugged Miniature Reflex) Dual Illumination sight from the other sights is that it operates without batteries. It uses tritium to illuminate the reticle in low-light conditions, along with fiber optics that automatically adjust brightness of the reticle level and contrast to available light conditions. An RMR pistol mount plate kit ($102) was required to mount the RMR to the Glock 20, bringing the cost up to $679. A hex wrench was supplied. The housing was made of forged aluminum with a sight window that was square on the bottom with an arc on top. No special tools were required to adjust the sight; in fact, in a pinch you can use the rim of a fired case. The clicks were audible and precise. The brightness of the reticle aiming point adjusted automatically when going from bright to dim light and vice versa. All sights had this feature, and testers appreciated it because adjusting a sight manually in a match setting is as unacceptable as it is on a carry gun. The sight window was thicker than the other two sights and that tended to block the view around the sight slightly when aiming with both eyes. The top edge of the sight window housed a translucent band that allowed light to get in and power the aiming point. The RMR was the largest and heaviest of all the sights, which is not that much to begin with, but the ruggedness of the sight gave testers a higher level of confidence in the sights ability to take abuse. Testers used the sight to rack the slide by grabbing it with their hand or catching it on the edge of a shooting table or holster. The sight stayed dead on, no change in zero. This sight took more muscle, meaning hammer time, to mount, but testers felt the sight was very secure. The price made testers cringe, but as they became acclimated to the sight, they liked the features.
Our Team Said: The battle-tested Trijicon RMR is very expensive, but the convenience of not using batteries outweighed the extra cost for some testers. If price were not an issue, many testers would opt for the RMR.
Gun Tests Grade: A
Burris FastFire III#300234, $250
The FastFire III had the smallest footprint of all the sights. A Torx wrench and screwdriver were included, along with a battery, lens-cleaning cloth, protective cover, and a clamp mount that can be used with a Weaver or Picatinny-style rail. An additional base (#118-000-011WB, $46.49 at Brownells.com) was required to mount the FastFire III on the G20. The Burris was easiest sight to install. A dovetail block easily slides into the dovetail in the slide. Center it, then attach the mounting plate with two screws. This locks the mounting plate to the slide. A flexible, soft gasket goes between the mounting plate and the sight. The sight is mounted to the mounting plate via two screws. The battery compartment is on the top side of the sight, and a flat-blade screwdriver is required to change the battery. A tiny flat-blade screwdriver is also required to adjust windage and elevation. The clicks were not as precise as the Trijicon, but we walked the aiming point around and back to zero, and it was still on.
Like the other sights, numerous reticle options are available. The big difference between the FastFire III and the other two sights was the user could override the auto illumination of the aiming point and adjust it manually. A rubber button on the left side of the sight controlled illumination. Press it once for automatic illumination, press it twice for highest manual illumination, three times for medium illumination and fourth for the lowest setting. Pressing the button a fifth time turns it off. The battery life is about two months with the sight constantly on. Users can turn off this sight, but they also need to remember to turn it on. The battery was easy to change compared to the Leupold, and because of the battery, there was more maintenance with the Burris compared to the Trijicon. A schedule would need to be made to keep the sight running, since a dead battery meant the weapon was out of commission. A two-pack of batteries is about $2, so the yearly cost to operate the sight would be about $6. Batteries are quite common.
The rear of the sight has a white vertical line on it that helped users acclimate to the sight and get them on target. The sight window was similar to the Trijicons – square at the bottom and arced on the top. At the range, the Burris performed well, allowing shooters to get on target and stay on target faster than with iron sights. The FastFire III was used to rack the slide, and the sight seemed very secure.
Our Team Said: The FastFire III is a bargain when comparing just price. The button operation was an extra step, but some liked to have the ability to adjust the illumination of the aiming point manually. Because of the more frequent battery-maintenance schedule, we knocked it down a half grade.
Gun Tests Grade: A-
Leupold DeltaPoint#66135, $565
The DeltaPoint features were in between those of the Trijicon and Burris. Like the Trijicon, the Leupold was always on, and like the Burris, it was powered by a battery. The DeltaPoint, however, is motion activated. It will shut down if left at complete rest for five minutes, which saves battery power. Once moved, the sight automatically turns on. A rubber cover included with the sight puts the sight at its lowest illumination setting, also reserving battery life. The battery should last 9,000 hours, or more than a year.
Included with the Leupold were 10 different mounting plates that fit everything from Smith & Wesson revolvers to numerous semi-automatics pistols, except for the big Glock. A plate was included for the standard-frame Glocks, but not the 45 ACP and 10mm models. Another $40 was required for a mounting plate from JP Enterprises, totaling $605. A mount for Weaver/Picatinny-style rails is also included for those wanting to mount it on a long gun. Though the mounting plate was not included for our Glock, the assortment of bases that came with the sight was a real plus. A rubber cover and a battery were also included.
Mounting the DeltaPoint was similar to the Trijicon. We first slid a dovetail mounting plate into the slides dovetail, then secured it with a screw. Then the sight was bolted to the plate. The sight needs to be removed from the mounting plate to change the battery, and we thought the sight would lose zero once removed. We found it was still zeroed after removing the sight from the base, though we would recheck it every time we replace the battery.
A tiny supplied Torx wrench was required to adjust windage and elevation. Locking set screws need to be loosened with the same wrench prior to zeroing the sight. The small tools required by both the Leupold and Burris made them less convenient, especially if the sight is swapped to another weapon in the field and the tiny tools are not readily available. With the Trijicon, the zeroing process was simple. There were no felt or heard clicks, just the turn of the screw.
The sight window of the DeltaPoint was oval with flat sides. It was the largest of all the sights, and it slightly bulged over the sides of the slide. The sides of the Burris and Trijicon were almost flush with the sides of the slide. The DeltaPoint was also the lightest sight. Running through the same shooting procedures as the other sights, testers found the DeltaPoint was very usable. The sight-window frame, like the Burris, was thin, so there was slightly less field-of-view obstruction than the Trijicon. Some testers felt they could get on target faster with the Leupold.
The sight also had less reflection signature, and the lens was crystal clear, unlike the other sights, which were slightly tinted.
Cocking the weapon using the sight caused fingerprints on the lens on all the sights. We wouldnt normally cock the weapon in this manner, but we wanted to know if the sights were durable and well attached to the slide. They all were.
Our Team Said: The DeltaPoint system was always ready, like the Trijicon, though it still required a battery. The power-saving mode was an asset, and like the Trijicon, it was expensive. The extra mounting plates were a plus and gave it a slight edge over the other sights.
Gun Tests Grade: A+
Written and photographed by Robert Sadowski, using evaluations from Gun Tests team testers. GT


