


")


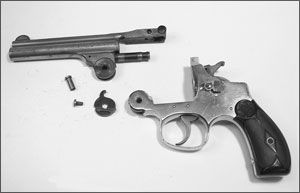
Smith & Wesson’s Perfected .38 double-action model was a top-break revolver with a distinctly 1880s look. It used the action of the more modern Hand Ejector revolvers, however, making it an odd mix of the old and new. This model was introduced in 1909 and was the last new top-break revolver design that S&W introduced. The story goes that a policeman was injured when the perp he was struggling with reached over and unlatched the barrel of his .38 Double Action top-break, leaving the cop with an open and unusable revolver. When Daniel Wesson heard this, he decided to design a top-break revolver that could not be opened so easily. What he did was to combine the best features of the top-break with the slick new action of S&W’s new .32 Hand Ejector revolver.
I can’t say for certain if that story is true, but this much is: Combining the internal hammer and trigger workings of the then-modern .32 Hand Ejector revolver with the quick-reloading top-break barrel of the .38 Double Action produced a true hybrid. To open a Perfected for loading, you have to lift the conventional top-break barrel catch, then in addition, you must push the thumbpiece (like modern S&W revolvers) to release a center-pin lock, very similar to the lock used on revolvers with side-swing cylinders.
By 1909 when the Perfected appeared, revolvers using side-swing cylinders were beginning to catch on with the public, and older top-break revolver designs were on their way out. As a result, the advanced Perfected Model was only manufactured until 1920, with a total of just over 59,000 revolvers being sold. Similar to S&W’s earlier .38 Double Action designs, the Perfected Model held five-shots in .38 Smith & Wesson caliber, and came in 3-1/4-, 4-, 5-, and 6-inch barrel lengths. The Perfected was almost identical in size as the previous and popular .38 top-break models, and even though the rear end of the revolver frame was all .32 Hand Ejector, both types shared an identical grip size.
On the inside, the Perfected’s lockwork was compatible with Smith & Wesson .32 Hand Ejectors of this period, beginning with the 1903 Third Change in 1909, which was the Hand Ejector model in production the first year the Perfected was made. For the 11 years of its production, Perfected actions followed the rapid advances made in the .32 HE design. In fact, the last Perfected models manufactured made use of the then-new hammer-block safety device common to the latest .32 Hand Ejector, the .32 H.E. Third Model.
Disassembly Instructions
Smith & Wesson .38 Double Action Perfected Model
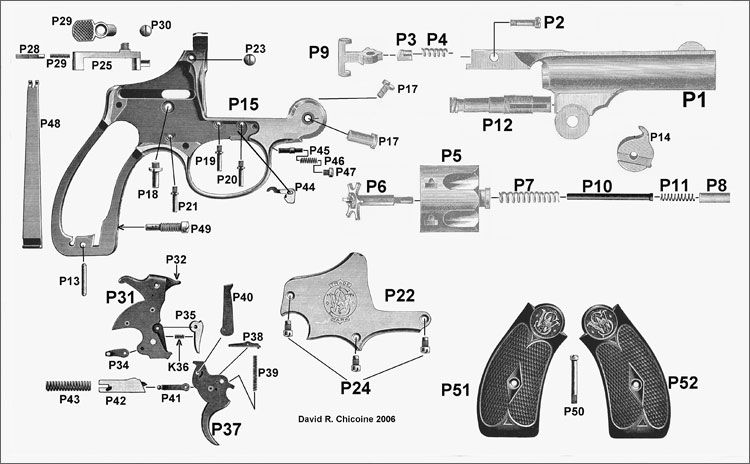
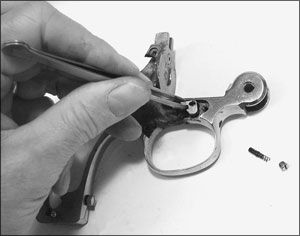
1. Hold the revolver firmly by its grip in your right hand, always keeping your fingers away from the trigger (#P37), at the same time being mindful to keep the muzzle pointed in a safe direction. Using the thumb of your right hand, push forward on the thumbpiece (#P29) and use your left hand to lift up on the barrel catch (#P9). At this point, you can lift open the barrel so it tilts toward the floor, exposing the rear of the cylinder. You can now check to be sure all the chambers are unloaded. If cartridges are present, remove them and place them in a safe location away from the gun.
2. Next, remove the cylinder (#P5). While the barrel remains open, hold the barrel catch in the up position and pull the cylinder to the rear, while at the same time rotating it in a counter-clockwise direction. As you do this, the cylinder can be withdrawn off the base pin (#P12) toward the rear.
3. To remove the barrel (#P1), unscrew and remove the joint-pivot screw (#P17) from the left side of the hinge on the frame (#P15). Use an appropriately sized straight punch and a small hammer to drive the joint pivot (#P16) out of the frame to the right side. Note the witness mark on the joint pivot and its corresponding mark on the frame. These marks must align for later reassembly.
The Smith & Wesson’s barrel is now free and can be lifted straight up, out of its joint in the frame. The extractor cam (#P14) is located between the ears of the barrel hinge. This part can be pulled down and out of the barrel hinge. Be sure to note the extractor cam’s position as it comes out for correct reassembly later.
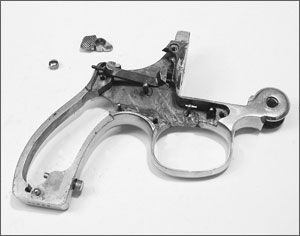
4. The grips and sideplate are removed by unscrewing and removing the stock screw (#P50) and lifting the stocks (#P51 and #P52) off the frame. Unscrew and remove the four sideplate screws (#P23 and P24). Turn the gun on its side so the sideplate (#P22) faces up toward you, and hold the revolver by the front of the frame over a padded bench-top. Strike the grip frame one or more sharp blows using a wooden or plastic mallet. This should cause the sideplate to leap up out of its seat in the frame. Don’t attempt to pry the sideplate out; you can easily damage it or the frame.
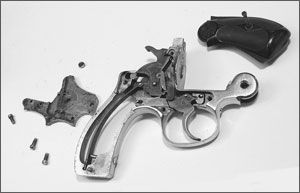
Notice the sideplate in the photo. This revolver is a late-model Perfected. Unlike the majority of Perfected models, tension for the hand in these later guns is supplied by a spring and plunger within the sideplate. (The associated differences in disassembly are noted in Step 10 below.) With the sideplate installed, this plunger bears on the sloped ramp at the rear face of the hand, forcing the hand forward. The hands in these later models can be simply lifted off the triggers once the sideplate is removed. Due to the delicacy of this plunger/hammer-block design, unnecessary removal of the spring and plunger is not recommended.
5. To remove the mainspring and the hammer, unscrew the strain screw (#P49) from the front of the grip frame. After this, the mainspring (#P48) can be disengaged from its seat at the lower grip frame by sliding it out the open sideplate side. At this point, it can be disengaged from the hammer stirrup (#P34) at its top and withdrawn from the frame. Hold the thumbpiece to the rear and pull the trigger all the way back, causing the hammer to rise. You can withdraw the hammer straight up, off its stud (#P18) in the frame while the trigger is pulled to the rear. Once you have the hammer out, the trigger can be released.
Assembly tip: When you reinstall the strain screw, be certain to turn it all the way in until it bottoms out as the factory intended. Gun owners will sometimes loosen the strain screw in order to lighten the mainspring tension, however, doing so changes the geometry of the mainspring/hammer, often leading to misfires and/or parts failures.
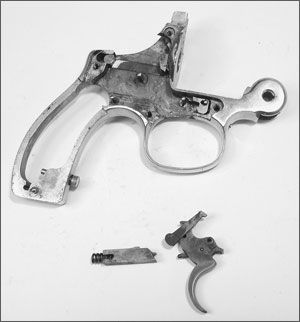
6. Removing the trigger begins by using a small screwdriver or other suitable tool to pry up on the rear of the rebound slide (#P42) causing it to pivot up off its stud (#P21). Use caution here; doing this will free the coiled rebound-slide spring (#P43), which is under heavy tension. Pull the rebound slide and its spring rearward out of the frame. Be sure the trigger is in the forward position, then use a small screwdriver blade to pivot the top of the hand (#P40) to the rear until it clears the frame. Still holding the hand to the rear, withdraw the trigger and hand assembly by pulling it straight up and off its stud (#P19) in the frame.
7. Remove the cylinder stop by unscrewing and removing the cylinder-stop screw (#P47). This is located at the top-front of the trigger guard. The cylinder-stop plunger (#P45) and its spring (#P46) are now free to be withdrawn out through this same screw hole. Push down the ball-end of the cylinder stop (#P44) to its lowest position, and use a pair of tweezers to withdraw the cylinder stop by pulling it straight up and off its stud (#P20) in the frame.
8. To disassemble the cylinder, first insert five fired cartridge cases or dummy cartridges into the chambers to support the extractor star. Tighten the extractor rod (#P8) by its head in the jaws of a drill chuck, and rotate the cylinder (#P5) by turning it in a counter-clockwise direction. This will unscrew the extractor rod from the extractor (#P6). The extractor spring (#P7) and center pin (#P10) can now be pulled out from the front. The center-pin spring (#P11) is pulled out of the extractor rod. The extractor is now free to be pushed out the back of the cylinder.
To prevent doing damage to the extractor spring during reassembly, grasp the front quarter inch of the extractor rod by its head in the jaws of a drill chuck. Assemble the spring onto the extractor, place the cylinder with its extractor over the rear end of the rod, and push the cylinder forward to compress the extractor spring as much as possible. Turn the cylinder in a clockwise direction until the threads have started by about one turn. Stop turning every full turn and allow the extractor to return by spring tension, then push the cylinder in to recompress the spring and continue tightening in one-turn increments until the rod is hand tight.
9. Disassembling the S&W’s barrel begins with unscrewing and removing the barrel-catch screw (#P2) from the left side of the barrel’s top-strap. The barrel catch (#P9) is free to be withdrawn to the rear. Hold the barrel in a muzzle-up position and tap the rear of the barrel top-strap on a soft wooden bench-top. The barrel-catch cam (#P3) and barrel-catch-cam spring (#P4) should fall out of their recess in the top-strap. Be sure to notice the correct positions of these parts for reassembly.
10. To disassemble the trigger, support the trigger by laying it on its side on a flat steel bench-block that has holes drilled through it for pins to be driven through. Remove the hand by pulling it out the right side of the trigger. Drift out the hand-lever pin using a tiny pin punch and pull the hand lever (#P38) and its spring (#P39) out through the top of the trigger.
Assembly tip: To reassemble the hand to the trigger, hold up the rear of the trigger lever while the hand is reinserted into the trigger to be sure the upper pin on the hand derives spring pressure from the hand lever. The lower pin is the pivot point. Note: Late model Perfected revolvers (also mentioned in Step 4 above) do not use a hand lever or hand-lever spring. These later model hands have only one pin, which acts as the pivot.
11. When disassembling the hammer, be sure to support the hammer by laying it on its side on a flat steel bench block that has holes drilled through it to allow pins to be driven through. Use a small pin punch of the appropriate size and a hammer to drive out the sear pin. Once out, the sear (#P35) and sear spring (#P36) are free and can be lifted off the front of the hammer. By driving out the stirrup pin, the stirrup (#P34) is freed for removal.
For ease of reassembly, take care to notice the position of the stirrup before removing it from the hammer. For correct mainspring operation, the stirrup must be reassembled in this same position. The hammer nose (or firing pin) is fastened into the hammer top by a special hollow rivet. Removal of the firing pin is not necessary for normal maintenance.
Further disassembly is not required for normal cleaning and maintenance of the revolver mechanism. Reverse the above procedures to reassemble the revolver. As you do, refer to the reassembly tips within the disassembly text above.

I see this 38 is a 5 shot revolver top lock . I have a Hopkins and Allien 6 shot top lock revolver short barrel 3 1/4 . Where can I find more information on it? Thanks