[Updated July 26, 2018]
There will never be another JohnMoses Browning as far as firearms design is concerned. If accolades for design longevity are in order, old John would rate at the top of the heap. Some of the designs contrived by this late firearms designer are still going strong many years after his death.
As long as awards for firearms design are being passed out, another name that should appear at the top of the list should be WilliamBannerman Ruger. He’s been producing innovative firearms since 1946, an achievement that is not likely to be duplicated.
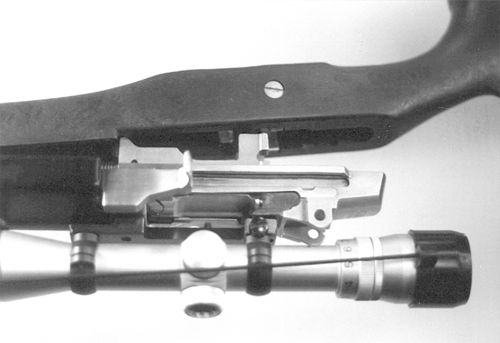
That may be overstating it a bit, but it is unlikely that many companies or individuals will come up with something like the Ruger Mini-14 and Mini-Thirty rifles. Both were born of the failed effort to develop the Ruger XGI, which was intended to be a civilian version of the M-14, only in a less cumbersome size. The original intent was to chamber the gas operated semi-auto in .308 Winchester but the action proved unable to handle the pressures from the cartridge. As far as I know, there were no .308 Winchester caliber Ruger XGI rifles produced for public sale.
At about the same time Ruger was experimenting with the XGI, large numbers of SKS and AK-47 semiautomatic rifles chambered for the 7.62X39 Russian cartridge began coming into the country, along with trainloads of low cost ammunition for them. The .223 Remington (5.56mm) had been adopted by our military for well over 20 years and was used in the AR-15 civilian version of the M-16. The ready availability of military surplus ammunition and the resulting low cost shooting fun did not go unnoticed. Ruger capitalized on this knowledge and chambered both the Mini-14 and Mini-30 for both the readily available military cartridges. As happens to most gas-operated rifles, the gas system eventually will “carbon up” to the point that it has to be cleaned. Takedown is pretty much the same for both rifles so, although we are dealing with the Mini-14 here, these instructions also apply to the Mini-30.
As always, open the action and check the chamber and bore to prove to yourself that the rifle is indeed empty and safe to deal with. The Mini-14 has a bolt hold open device that automatically engages to hold the bolt and slide back in the rearward position. This device only functions with an empty magazine in the rifle. The magazine follower has a lip that is captured by the hold open device upon firing the last round of the magazine. The bolt hold open latch, at the left side top of the receiver, is a little cylinder-shaped button. Once the empty magazine is removed, the bolt handle can be pulled back and the button will pop up and the bolt can be released forward. To activate the bolt hold open device without a magazine in place, pull back on the bolt handle until it is all the way back. Depress the bolt hold open latch button and then ease the bolt forward until the bolt is stopped by the latch. Magazines can be inserted into the rifle with the bolt held open or with the bolt in the bolt forward position.
Ruger Mini-14 Subassemblies
Three basic subassemblies, the barreled action, trigger group and bolt assembly, are involved here. For the sake of simple cleaning, the rifle need only be taken down to these groups. If other problems exist, you’ll need to go well beyond the instruction pamphlet provided with the firearm.
To disassemble the Mini-14, the first thing that you must do is remove the magazine and set the hammer in the cocked condition. Pull the bolt handle all the way back, cocking the hammer, then release the bolt forward. Push the safety back to place it in the on position. Place the rifle in your padded jaw vise with the trigger guard pointing up. It works best for me if I hold the barrel in the leather-faced jaws of my vise.
The trigger guard is also a latch that pivots forward with a little persuasion from an easily-made hook tool. I use an old screwdriver with the blade ground off that has been heated up and bent at the tip. A short length of shrink tube over the tip keeps the tool from marring any metal surfaces. Hook the tip into the cutout in the rear of the trigger guard and pull up. This disengages the rear of the guard, which will pivot forward and rise up and out, coming free of the rifle. For the moment, just set the trigger group aside.
Lift the rear of the stock up and pull backward on it to remove the stock from the barreled action. Set the stock aside and rotate the barreled action so the right side of the action faces up toward you and the bottom of the receiver is away from you. This way, the recoil spring and guide rod are less likely to pop into your face when they are removed. Pull forward on the recoil spring guide and then, while holding it tightly, release the spring’s tension rearward and remove it. The bolt handle and operating slide are no longer under tension and will slide fore and aft quite easily.
At the right rear of the receiver, you will see a half-oblong shaped cutout. Pull the bolt handle back until you can feel it fall into this cutout. Pull the bolt handle up and the operating slide should come off the barreled action. You may have to rotate the handguard around slightly for the operating slide to clear for removal.
Pull the bolt forward until it will rotate at the front and it will come out of the ejection port of the receiver. Observe carefully how the bolt rotated to come out. When you replace the bolt into the receiver make sure that the fin at the rear of the bolt body gets into the raceway in the left side of the receiver. You will also notice a small cutout in the reinforcing web in the receiver. Once you get the bolt in place, it will be helpful during reassembly to pull the tail at the end of the firing pin through this cutout as you set the bolt in place.
The hand guard is held in place at the rear by a thin spring steel pinch clamp. At the front, the handguard is secured by four hex-head machine screws that are tapped into the gas block. A 9/64-inch hex wrench will remove all four of these screws. Once the gas block has been separated, be careful that the little gas port bushing doesn’t get away from you. This is a tiny little tube that transfers the gas escaping through the gas hole in the barrel into the gas block and through the gas piston to work the action.
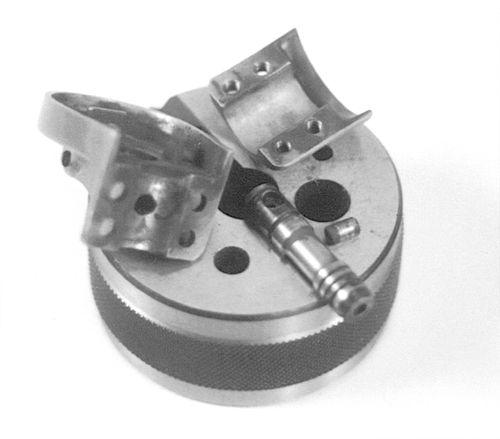
You will immediately see that there is a black carbon buildup in and around these parts. A scrubbing with a good solvent should remove all of this carbon but if you get some that is stubborn, #0000 steel wool soaked in your solvent will dislodge it without hurting the finish if the gun is blued. Some of these parts are not easily accessible for the steel wool and will have to be scrubbed with a steel bristle brush. A thorough overnight soaking in a solvent like Shooter’s Choice will loosen most of this crud. Whenever possible, I use an evaporating solvent in cleaning semi-auto gas systems so the carbon cannot combine with whatever lubricant was used and gum up the gas system with a shellac-type material. When putting these parts back together, make sure the gas piston hole points up toward the little gas tube. If it doesn’t, you will have a single shot instead of a semi-auto.
At the left side of the receiver, there is a plate or cover for the bolt hold back latch system. Pushing up on the thumb cut will reveal the internal parts and give access for cleaning and lubrication. A dab of your favorite gun grease will keep things working smoothly in this area. Observation will show you how these parts relate to one another.
Ruger Mini-14 Bolt Disassembly Dangers
We’ve gone a bit beyond what Ruger calls normal takedown for cleaning. Their recommendation is to break the rifle into the three subassemblies and swish the parts around in a cleaning solution, then give each part a serious blasting with compressed air. For most purposes, this should be enough to keep this rifle operating until your grandchildren are old enough to use it. If a firing pin breaks, or for some reason the extractor doesn’t extract, the bolt group will need to be disassembled. The bolt design of this rifle is ingenious, in that everything is held together with a single pin. This pin is actually an extension, or leg pin, that is a part of the extractor. When this pin end of the extractor is drifted out, all hell breaks loose if you are not prepared for parts coming out under spring tension. The pin holds the ejector and its respective pin in place, along with the extractor plunger and its spring. Although it isn’t under tension, the firing pin is also held captive by this pin. Reassembling all these parts and getting them lined up properly will have you babbling to yourself in short order. If there is no major cause for disassembling the bolt, don’t do it.
The trigger assembly is extremely strong and is something that Ruger is very sensitive about. The manufacturer recommends that this unit not be disassembled. Triggers and hammers will not be sold to anyone and any needed replacements are made only at the factory. As this is a semi-auto operated firearm, the sear engagement should not be altered or tampered with to avoid a dangerous situation.
There are several aftermarket extended magazine release latches available that can be easily installed in just a matter of minutes. A cross pin holds the magazine release and its operating spring in place. A hole in the rear end of the hammer strut will accept a straightened out paper clip to hold the spring back while the hammer is in the cocked position. If you need to disassemble the trigger group, place a paper clip in this hole and then relax the hammer forward. A 0.187-inch cross pin holds the hammer and trigger guard in place. Once this pin is drifted out, these two parts will come free of the trigger group. At the rear of the trigger group is a 0.125-inch pin that contains the trigger and secondary sear. Drifting out this pin permits these parts to be removed. The pin in between these two on the left side of the trigger group is staked in place and operates as the pivot pin for the safety. No attempt should be made to remove this pin. Observe how all these parts fit into the picture along with the trigger return spring and the safety detent spring. Assembly is in reverse order. On all pivoting and moving parts, a dab of a good lubricant will help keep parts wear to a minimum.
There are all sorts of aftermarket fiberglass and folding stocks available for these rifles. Choate makes a recoil pad that will extend the length of pull about an inch. This should help those who feel the factory stock is a little short for them. B-Square makes what they call a no-gunsmithing scope mount for either of these rifles, if it is not the Ranch version, which is provided with rings for the integral bases provided.


