


")


[Updated July 25, 2018]
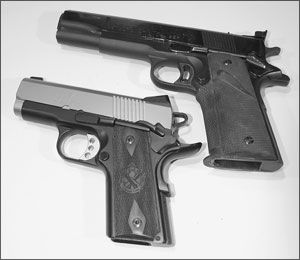
I’m one of those old geezers who still insists that the best personal defense ammunition ever made is .45 caliber. It pleases me, then, to note the current trend among pistol manufacturers to arrange marriages between this caliber and their respective products. With few exceptions, however, the pistols so adapted are on the large size for discreet concealment, and they can also be troublesome for those with smallish hands.
In any case, the available calibers are not the only things I like about the EMP from Springfield, Inc. It’s no larger than a compact 9mm. It’s a Series-70 M1911A1, so it’s not cluttered internally with a collection of additional parts dreamed up to put a firing-pin block in a pistol that can’t fire unless it is gripped firmly in the hand. As this is written, the EMP is being produced in 9mm using a hard-coat aluminum-alloy frame. When it comes out in .40 S&W and .45 GAP, the frame will be of steel. Those initials behind the “.45” stand for Glock Automatic Pistol, a round developed in cooperation between the Austrian pistol maker and Speer.
The .45 GAP is slightly shorter than the 9mm Luger and contains an advanced propellant producing higher velocities without creating pressure problems. It’s the same type of powder technology used in the very popular short magnum rifle rounds. Be assured, when pushing out 185 or 200 grain slugs, the GAP feels like a .40 S&W but hits like a .45 ACP. I won’t compare it to the impact of a 230-grain FMJ, but I’m guessing that a .45 GAP exiting a full-size accurized M1911A1 might just make one doozy of a bullseye round. (I must explore that possibility further one of these days.)
Gun TestsSpringfield Armory EMP reviews:
American-Made 9mms: Ruger, Springfield, and Honor Defense
Three More Ankle Guns: Kahr, Springfield, and Walther 40s
Pocket 9mm Concealables: Springfield, Kimber Get the Nod
Although the Springfield EMP differs in about 15 ways from a pure Series-70, gun owners can rejoice: It’s taken down and reassembled in ways very close or identical to the semi-auto most of us are familiar with. When you take it apart, you’ll find that all components of the EMP serve exactly the same function as those in a full-size M1911A1—though not all parts will interchange with those of the full-size pistol. In shrinking the EMP to the size it is, there had to be changes made. (I measured 6-1/2 inches from muzzle to the extreme end of the beavertail grip safety. The slide measures 5-1/2 inches, with a little over 3 inches of barrel and a grip width of 1-1/16 inches.) Due to their reduced width and depth, magazine bodies, of course, are not interchangeable. And even eyeballing the difference between a standard-size mag and the one used in the EMP would scream “not interchangeable.” Perhaps not so obvious (without taking comparative measurements) also on the “not interchangeable list are the EMP’s plunger tube, slide-stop plunger, thumb safety/slide-stop spring, extractor, and safety plunger. On the other hand, the hammer, sear, sear spring, and firing-pin stop you find in the EMP will fit any other M1911A1. And vice versa.
Speaking of Field Stripping
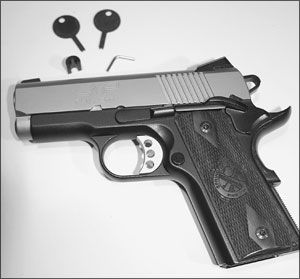
Field stripping the EMP is a bit different than what you’re accustomed to with one of its larger brothers. The EMP arrives with a small cellophane bag in its box. In the bag, among other things, is a short length of rigid plastic tubing. It gets snapped onto the end of the recoil-guide rod that is exposed when you lock the slide to the rear. The plastic retains the guide rod assembly. You unlock the slide and slowly allow it to move forward to align the stop with the disassembly notch. Push the slide stop out from the right, and then move the slide forward and off the frame. Invert the slide, then lift the recoil-spring assembly by its rear end, pull it from the slide, and push or pull out the barrel.
There is no barrel bushing on an EMP. The reason is that the barrel is flared out at the muzzle. In the regular M1911A1, the barrel bushing serves as a pivot that encourages the barrel to return to the same position in the pistol after each shot. The EMP’s flared barrel accomplishes the same thing. Opinions vary as to whether this type of barrel alone is as effective in achieving mechanical repeatability as a well-fitted barrel/bushing combination. Since the EMP is intended to serve as a defensive handgun—not a surgically accurate target pistol—I’ll leave all arguments on the flared barrel versus barrel and bushing to others.
Detailed Disassembly
After removing the grips, the slide can be further stripped down like any other M1911A1. All M1911A1 pistols, however, do not have ambidextrous thumb safeties. The EMP does, and you remove the right-hand one first. In case you’re working on the 9mm model, please remember it has an aluminum-alloy frame. If merely grasping the safety and pulling on it fails to separate it from its tongue-in-groove union with the left-hand thumb safety, be sure that further attempts to separate these parts don’t damage the frame or the safeties themselves. The union just mentioned can be quite tight depending on how much it has been squeezed together during factory assembly. I was on the lucky side. The right side parted company with the left safety without any great strain.
Thinking that the safeties might balk at the separation, I devised a couple of harmless ways to “encourage” them. The first was to sand one end of a tongue depressor into a thin, wedge shape and force it under the right safety to get it started. This could be followed with a hardwood dowel, similarly sanded but thicker, pushed in under the safety to move it further outward. (Even though I didn’t need these wooden tools, I kept them anyway for possible use in the future.) If the wooden wedges had failed, I took the precaution of preparing a backup plan. You could add two narrow strips of duct tape to each grasping surface of a set of smooth-jaw pliers. Then secure the frame between padded vise jaws and grab onto the right-hand safety and pull it free. Obviously, I’ve been faced with resistant safeties before.
After the separation, the left safety is drifted or pushed out like a single thumb safety, and then you can attack the hammer pin, sear pin, hammer, sear, and other internal parts just like a full-size 1911.
And now we come to another one of the difference—the mainspring housing. Current production Springfield M1911A1 pistols, including this EMP, have an ILS (internal locking system). In addition to the plastic recoil-system retainer in the cellophane bag are two objects resembling keys as well as a small, angled length of bright steel. The key-like pieces have two small nubs at one end. Those nubs fit the holes in the lock, located on the left in the textured area of the housing. When the holes are in a vertical position the pistol is unlocked. When horizontal, the pistol is locked. And I mean totally locked up; the hammer can’t be cocked, the trigger can’t be pulled, and the slide can’t move.
Locking and unlocking is done by inserting a key and turning it clockwise or counter-clockwise. You’ll want to remember that in case a customer walks in complaining that he “can’t make this gun work.” Check the position of the lock before you do anything else. Just don’t do it while the customer is present. (You can make a couple of bucks and impress your customer if you ask him to come back in 15 minutes.)
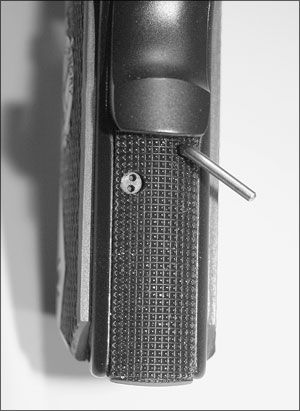
I usually don’t get into the disassembly of a safety system. In this case, however, I will. Given enough abuse, or ignored over a long enough period of time, a safety can break or become so terribly fouled it can’t do its job anymore. With the Springfield ILS, it’s possible to repair or clean it and restore full function: Lower the hammer and turn the lock to its vertical position. Wrap a heavy rubber band around the grip safety until the safety is completely depressed. This keeps the sear spring properly positioned in the gun. Cock the hammer and insert one end of the angled piece of bright steel (known as the “takedown pin”) into the hole immediately under the beavertail on the right side of the grip frame. This captures the mainspring cap (#5d) and maintains partial compression of the mainspring (#5c). Slowly lower the hammer to its fully forward position. With the correct diameter punch, drift out the retaining pin (#1i), remove the housing downward, and secure it between protective vise jaws. Select a punch that matches the diameter of the mainspring cap and press the cap downward. Continue pressing down as you remove the takedown pin. Ease off the pressure, and let the cap clear the top of the mainspring housing. After lifting away the cap, you can pick out the mainspring and mainspring retainer (#5b).
A few important points to remember: (1) The system can only be reassembled when the ILS is unlocked or vertical; (2) don’t turn the lock when the ILS is disassembled; and (3) If there’s no need to disassemble the complete locking system, don’t pull out the takedown pin until the mainspring housing is reinstalled.
