


Why does an illuminated dot provide faster recognition for the shooter? First and foremost, the illuminated dot is the brightest object in the field of view. This brings your eye to the dot like a magnet. The key to shooting quickly with an illuminated dot is to focus on the target with the dot in your peripheral vision. Find your desired point of impact, cover it with the dot, and fire.
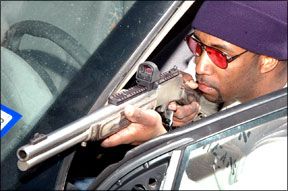
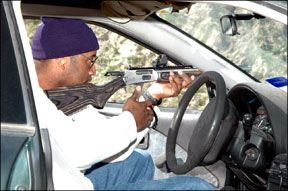
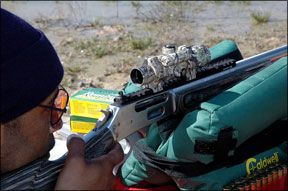
In this test we will be evaluating several aspects that we think should be considered when choosing an electronic dot scope. Ease of mounting and sighting in, durability in terms of function and repeatable adjustment, and quality of vision regarding the dot and its surrounding field of view. To test we enlisted the help of two rifles. They were the Smith & Wesson M&P 15-22 and the Marlin 1895SBL. The M&P 15-22 was tested in our February 2010 issue and fires 22LR ammunition. The Marlin 1895SBL is a big-bore lever-action rifle that shoots fat 45-70 cartridges, (www.marlinfirearms.com/Firearms/bigbore/1895SBL.asp). We began by sighting in each scope atop the Marlin 1895SBL and firing from the 100-yard line at Phil Oxleys Impact Zone (www.theimpactzonerange.com). Here we used Remington 405-grain soft points (R4570G) and PMC 405-grain lead flat point ammunition. Next, we fired at a multiple target array to experience what each scope had to offer in terms of rapid acquisition. For this portion of our test we fired Winchester 300-grain JHP rounds (X4570H). We chose the hefty Marlin for two reasons. First, it supplied enough recoil to challenge the durability of the scopes. Next, working its lever action provided an extra interruption to sight alignment above and beyond the recoil impulse. Our target array consisted of five cardboard IPSC targets for backing arranged in a triangle or “Christmas tree” pattern. Point of aim was a Reckstine Sight-In Target fixed at center mass on each backing. Actual distance from the shooter for each target was, left to right, 22.5 feet, 33 feet, 47 feet, 39 feet and 23 feet. Exercise One was to engage all targets with one round each moving from left to right. Start position was shooter facing downrange muzzle pointing towards the ground about 2 feet in front of the shooter. A round was in the chamber with four rounds in the magazine. The hammer was back and the crossbolt safety was activated. Exercise One was attempted two times and we recorded total elapsed time for each run. We also took note of shot placement on each target.
For Exercise Two we changed to fresh Reckstine Sight-In Targets on each backing. Exercise Two required that the shooter begin with the furthest target at the top of the triangle. Order of engagement continued with the furthest target to the left, the furthest target to the right and then left to right on the pair of near targets. Again, we recorded total elapsed time and made note of shot placement. Each scope was tested in this manner and the shooter was allowed to dry fire each exercise before firing beginning each exercise. In fact, we recorded the elapsed time of the very first dry fire run, from audible start signal to the final drop of the hammer. We used this to set a par time on our Competition Electronics shot recording timer. This provided an audible structure against which to measure our dry fire practice.
The Smith & Wesson M&P 15-22 AR-15 style rimfire carbine was used primarily to test repeatability of zero. We began by undoing all previous adjustments. This meant centering the dot inside the scope. We did this by turning down the elevation screw until it stopped, then turning it in the upwards direction counting each click until the screw stopped again at its maximum elevation. This takes concentration, patience, and a soft touch so not to damage the mechanism. We then divided the number of clicks by two and turned the screw back to its mechanical
center point. We repeated this chore with the windage adjustment. It is important to begin with the adjustments at center because this offers the greatest amount of potential adjustment and the least amount of strain on the adjustment mechanism. In addition, we believe that even without magnification, the center of a given lens is the point at which it is most visually efficient.
For our repeatability tests we visited the 25-yard line at American Shooting Centers, (www.amshootcenters.com). From the bench we zeroed each scope. Then we turned the windage adjustment 10 clicks left and shot a group. Next, we turned the adjustment 20 clicks to the right and shot another group. Finally, we adjusted the scope 10 clicks to the left and looked for a group with its center over the original point of zero. On our test days we did our best to wait out any gusts of wind that might skew our windage test and judged accordingly. We repeated this test for elevation adjustment by going 10 clicks up, 20 clicks down and then 10 clicks up. We think dot scopes will rarely be used like a mil-dot tactical scope (for example, dialing in changes and returning to zero), but we hoped this test would simulate longer term use that would likely include being readjusted for use on any number of rifles or handguns. Would one scope stand out from the others? Lets light them up and see what happens.
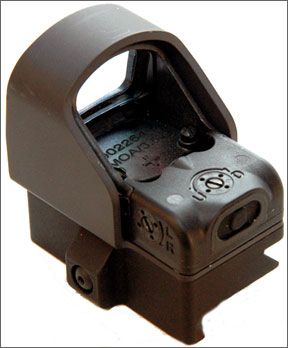
Insight Technologies MRDS MRD-000-A1, $650
The MRDS scope is based on an earlier product, the Docter scope. Several companies have released their versions of the Docter scope, but the MRDS is the most expensive. Much of the cost, we think, was devoted to making this design meet or exceed military specifications. Durability of mil-spec products is a top priority, but right away we noticed two improvements to the original design. The Doctor scope turned itself on and off. Remove the cover and the Docter reacted to light. The MRDS scope had an
on/off button sealed by a rubber membrane on its rear surface directly facing the operator. Press and hold it down, the dot appeared. It was turned off in the same manner. Available with either a 7.0-moa or 3.5-moa dot (our unit showed the latter), the unit adjusted brightness automatically. Power was supplied by a number 1632 lithium battery. This is not the easiest battery to find, but run time is rated at 250 hours or one year. Auto shutoff is listed as after 6 hours regardless of setting. To test we turned it on at 2:20 p.m. one afternoon and well be doggoned if it didnt shut off some time between 8:15 p.m. and 8:30 p.m. In fact, we left it on quite a bit with no discernible reduction in service. Intensity was also adjustable by pumping the on/off button through a cycle of four levels of brightness. We think the order of intensity is supposed to go from least intense to its brightest setting and then back down. But it seemed to be different each time we tried it. The switch was difficult to operate through the stiff rubber membrane, so perhaps this played a part in the confusion. Nevertheless, we thought the quality of the dot was exceptional. Another change from the original design was improved access to windage and elevation adjustment. But we did need to carry a very small screwdriver to turn the adjustment screws.
The dot was projected from the shooter side of the scope on to a lens that was clear enough for the shooter to look through, but reflective enough to display the dot. The point of the projection was from
the scope body about an inch behind the lens, which might also be called the screen. The screen was a 0.9-inch-wide rectangle with a D-shaped top that measured slightly more than 0.6 inches at its highest point. The angle of projection was approximately 45 degrees, and you can actually reach in and block the projection. When the scope is tipped downward, the lamp was visible. This is called signature and could possibly give away ones position in a low-light situation.
The MRDS scope was very light weight. It can even be mounted onto the slide of a handgun. But for our purposes we attached it to the optional MRDS 1913 Picatinny mount ($100). We also added the MRDS Protective Shroud, $50, (a form-fit rubber cover was standard equipment). The mount clamped on with a single cross bolt and a single slot screw with knurled edges. We would judge both these items as top notch, but frankly we found it difficult to ignore the $800 total suggested retail price tag with these geegaws included.
At the 100-yard range, sighting in the MRDS was simple. The combination of the Marlin 1895SBL and the PMC ammunition printed five-shot groups that averaged about 3.1 inches on average. The
Remington ammunition performed much better, producing five-shot groups ranging from 1.6 inches to 2.6 inches across. Mounted on our Smith & Wesson M&P 15-22 carbine, the MRDS went into our adjustment repeatability test with centered adjustment mechanisms. We found the windage and elevation screws could be turned a total of 210 clicks. Turning the adjustment screws counterclockwise 105 clicks from stop we hoped to have the scope mechanically centered. In fact, when it came to zeroing the MRDS on our carbine, we were within 10 clicks of adjustment in both windage and elevation. Beginning with the windage screw, we found that 10 clicks moved our point of impact about 3 inches at 25 yards. After shifting the dot to both the left and the right of our zero, the dot came back to as close to dead center as we were able to measure. But elevation was not as exact. After moving the dot up 10 clicks, then down 20 clicks we found the final reset to be less accurate. Each time we tried, an additional 10 to 13 clicks was necessary to bring the dot back to zero elevation. It seemed as if the upward clicks were half as effective in lifting the dot as they should have been. This may be a result of spring fatigue in the mechanism. However, once set, this scope was clear and precise.
To begin our action tests the first chore was to remount the scope. We did our best to remember
where along the expansive Picatinny rail we had mounted the MRDS earlier in the day. We tried it out at 25 yards, and the adjustments were still in place. To begin the action test, our shooter, who is an Iraq War veteran, was able to dry fire through both exercises in about 5.90 seconds on the first try. But with a few dry runs under his belt (and some adrenaline), he was able to shoot all five targets in a left-to-right pattern, completing Exercise One in an average time of about 5.26 seconds. Starting on the furthest target for Exercise Two, then zigzagging left to right, elapsed times were 5.07 seconds and 5.51 seconds for each run. After both exercises had been shot, we found only one 8.5-by-11-inch target missing a single hit. Typical spread was one hit placed about four inches above the other. This was a very consistent performance.
Our Team Said: Very small and compact, the dot was clear and the unit seemed durable. The MRDS can be used as a primary scope or as a near target companion to a high magnification long range scope. Base price is high in our estimation. But we could certainly justify purchase if the extras that we view as necessities, such as the Picatinny mount, were included in the price.
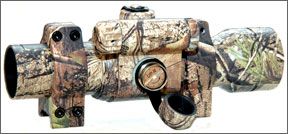
Aimpoint 9000SC, $445
The Aimpoint 9000SC scopes feature aluminum construction consisting of a control housing centered on a 6.3-inch-long 30mm tube. The viewing end of the scope (ocular end) was smaller than the objective side. We measured about an inch in diameter at the shooters side and just less than 1.25 inches in diameter up front (about 27mm and 32mm respectively). The surface of our scope was coated
with a camouflage pattern. So was the pair of rings that were supplied. This pattern was so efficient it could be seen blending into the landscape in some of our photographs. Unfortunately we learned at press time that the camo version has been discontinued. But many are still available, and aside from color specifications and functions, were identical to remaining 9000SC models. Windage and elevation caps were held close by lanyards that allowed the caps to be removed but not lost. The battery compartment was a separate tube that rode outside the scope body in between the windage and elevation adjustment screws. The screws were click adjustable with the points of the high quality dampening pegs clearly visible as they meshed with each ratchet. Given this was a tubular scope the adjusters can be rotated from the 12 oclock to 3 oclock positions for right handed shooters to 12 oclock and 9 oclock for left hand shooters. To wit the heads of each adjustment screw showed an arrow but one was marked, Up and R, and the other Up and L. Our scope was equipped with a 2-moa dot that was projected from a 45-degree angle above centerline of the scope. The projector was completely encased by the scope, but a red pinpoint was visible from the front of the scope. However, signature was minimized by being recessed inside the tube.
The Aimpoint took a solid mount thanks to the pair of supplied rings that included a square cross pin at the bottom. The rail and the scope body were locked

dependently via two Allen screws at the base and two more Allen screws at the top of each ring. Leveling the scope can be a little tricky because you couldnt actually lock the scope into the rings until you tightened its hold on the base. But this design does minimize bulk. The Aimpoint ran on a single battery and you can use either a 2L76 or a DL1/3N. The DL1/3N batteries are generally easier to find. Battery run time is rated at 50,000 hours when the scope is left on at three quarter power. (Readers interested in a followup test in this regard are advised to upgrade to a lifetime subscription). The scope was listed as having ten separate intensity levels, but a turn of the switch located on the shooter side of the battery compartment could only find nine illumination points unless we counted the off position. Counting the off position as number one we found no visible dot until we reached position five. But we thought the remaining levels of intensity were more than adequate and the dot itself was excellent as was the quality of light inside the field of view.
Sighting in from the 100-yard bench proved to be a quick process. Perhaps this was as much a testament to the Picatinny rail on the tactical-style Marlin rifle as it was to the quality of the scope and rings. Five-shot groups that averaged about 3.0 inches across firing the PMC ammunition and 2.0 inches across firing the Remington rounds of 45-70 Government were easily had.
Next up was the action test with the 9000SC still mounted on the big 1895SBL lever action rifle. Beginning with a dry fire run from audible start signal we struck the timer as soon as we heard the hammer fall for the fifth shot. The result was a template time of 4.61 seconds. This was faster than was achieved with the MRDS. Our shooter explained that due to the height of the Aimpoint scope, it was easier to find a cheek weld that yielded a usable alignment between the eye and the dot. Live fire runs on Exercise One were over in 4.88 seconds for the first run and 4.96 seconds for the second go-round. In terms of hits, we found three targets with only one hit on the notebook sized Reckstine Sight-in Targets. Hits off paper were found nearly directly above on the target backing. We would surmise that the shooter was raising his head at times. We think this did not occur when firing the lower mounted MRDS scope because the shooter was keying in on keeping a tight cheek weld. Otherwise, it was impossible to see the dot produced by the MRDS. Exercise Two showed much better accuracy. All shots were present and the distance between hits on targets numbered two through five was about 2.9 inches in length. The first target engaged had one shot low and the other high of center about eight inches apart.
The following week we set up at the 25-yard bench at ASC. Before firing we turned down the adjustment screws and learned that 360 clicks of windage and elevation were available across the range of our scope. Backing each screw 180 clicks returned our 9000SC scope back to mechanical center. Then we mounted it on our Smith & Wesson M&P 15-22 carbine. We moved the dot left and right via the elevation screw and then the windage screw. Each time we tried these tests the dot moved an equal distance from its original zero. Points of impact generated by the Aimpoint 9000SC turned out to be as repeatable as setting a clock.
Our Team Said: Well thought out, very clear optically, long battery life, solid mounts and precision adjustments for windage and elevation. Perhaps a little higher priced for the casual shooter but will probably outlast most other products and give superior service in the meantime.
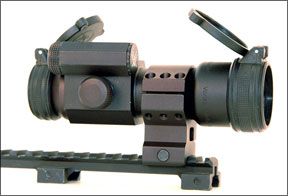
Vortex StrikeFire Red Dot Scope SFRD-AR15, $179
The suffix AR15 is appropriate for this scope because it follows a popular template of tactical scopes developed for the flat top receiver of AR-15 rifles and carbines. Built on a 30mm tube, the control module
0)]was mounted to the rear of center. Perched between the windage and elevation adjustment screws was the tubular battery compartment. A single CR2 lithium battery supplied power. According to the owners manual, battery life is rated at 200 hours at the highest of ten settings and 3000 hours at minimum illumination. Unlike the Aimpoint 9000SC, the StrikeFire cannot be rotated to accommodate left-handed shooters. Thats because the left side of the scope is where the controls are located, each protected from moisture by a rubber membrane. All controls are operated by push button though the rubber membrane. These include an on/off switch that doubled as a selector for either a green dot or a red dot. Press once for a red dot. Press twice for a green dot. Pressing a third time shut down the scope. Intensity was controlled by two switches mounted one above the other. The upper switch added intensity and the lower one dimmed the light. Between these two buttons is a control for night vision. Pushing this button will reduce illumination for use with night vision optics. In this mode the intensity buttons limit intensity to one higher and one lower level of dot illumination.
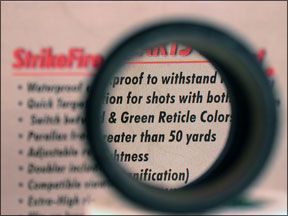
The front lens of the StrikeFire was unusually mirror-like. This helped hide the signature of the projection but what advantage you might gain in stealth under low light conditions we think would likely be given back in daylight or any time a ray of light found the objective lens of the scope.
The front and rear apertures of the scope were capped with flip-up lens covers. The flip-up action was powered by coiled wire. The first time we used the scope, we tore open a fingertip on an exposed end of the coil spring. The lens covers never came off the scope and stayed tightly in place. But after a while they wouldnt stay closed, either.
A 2X magnifier was included at no extra cost. The forward end was threaded so that it screwed into place without having to remove the rear lens cover. This “Doubler,” as it was referred to in the manual, featured focal adjustment by turning the rear part of the eyepiece.
1)]A sturdy single scope ring was supplied. The front and rear of the scope was flared, but about 1.4 inches of its 30mm tube was exposed for mounting the ring. The ring covered one full inch of scope tube and one full inch of contact with the base. The entire assembly was aluminum save for the steel crossbolt, lock-washers, and a hexagonal nut. This scope ring would be listed as a high level ring, and there was a relief just above the base that in some applications could provide access to a set of iron sights.
Once the Vortex was mounted on the Marlin, we attempted to sight in the StrikeFire from the 100-yard bench. Normally we would start from 50 yards or closer, but our nearest access was the 100-yard range. Our first shots did not appear on paper. Without using binoculars or a scope our spotter informed us that our shots were so low they were skipping off the ground about 35 to 50 yards downrange. We were shooting with the 2X eyepiece installed and we thought it did a good job helping us aim at the distant target. But it also reduced our field of view considerably, and we wondered if it was causing a problem perhaps due to some sort of refraction. But removing the eyepiece had no effect on our point of impact. Attempts at getting our shots on paper ended when we ran out of elevation adjustment on the scope itself. At this point we suspended further tests.
Upon further evaluation we decided to try shimming in an attempt to change the angle of the scope to the bore of our rifle. Shimming involves adding a thin layer of material to raise one end or the other. Since this was a single ring mount we decided to shim between the base and the bottom of the scope ring rather than between the ring and the scope body itself. We needed to jack up the rear of the scope so that the dot was lower on the target. In this way we would compensate by raising the muzzle. Before firing we turned down the adjustments and counted 168 clicks high to low and left to right. Eighty-four clicks later we had the dot in its original condition. But the best we could do with shims in place was about 5.0 inches low at seven yards. Once again we suspended our test session.
The next day we decided to try mounting the StrikeFire in one half of a pair of 30mm High mount See-Through Sport Utility rings from B-Square ($12 from www.bsquare.com). With the Strikefire mounted on our 22 LR caliber Smith & Wesson carbine, we headed to the range to try our repeatability tests. Our windage adjustment at 25 yards turned out to be off by almost 20 clicks. But we only needed two clicks of elevation adjustment to match our point of aim. From here we continued with the repeatability test and each time we were able to move the dot left and right, up and down at will with accurate return to zero.
We did not attempt to use our new setup on the Marlin rifle because a single Weaver style ring was not designed to work alone against the heavy recoil of 45-70 ammunition. Furthermore, the tactical rails found on the 1895SBL are cut with so many slots that the amount of surface area available to support the bottom of a single ring was minimal. Had the much larger supplied ring been properly machined or, had we at our disposal a full length mount, we would have completed our tests.
Our Team Said: In our evaluation of the Vortex StrikeFire Red Dot scope, we reached several conclusions. First, we didnt think the dot was bright enough. Both the red and the green dots seemed fine indoors or, in reduced light. But we think most shooters will find neither dot to be bright enough or dense enough for rapid acquisition in even moderate sunshine. Changing out the CR2 battery twice (at about $10 each) had no visible effect regarding strength of illumination.
The StrikeFire does come with some nice extras, the best of which we think was the Doubler or, 2X magnifier. But wed probably end up replacing the lens covers and sending the ring mount back to the manufacturer for replacement. Better yet wed purchase a more suitable mount from a precision manufacturer such as B-Square, LaRue Tactical, or Yankee Hill Machine.


