


[Updated November 14, 2018]
It is a given in the firearms industry that manufacturers have to find ways to cut costs to compete with foreign gunmakers. One of the areas, small as it may seem, that is being cut back is the use of threaded holes. If a pin can do the job, that’s the route gun makers take.
The need for threaded holes probably won’t diminish on the better firearms we see, mainly because of customer perceptions. They equate threads with quality, even though straight pins might do the job just as well. That was certainly evident in the great hue and cry that went up when Winchester replaced screws with pins on one of its rifles years ago.
I wouldn’t stake my life on threaded devices being with us from now on, but I submit that no one has shown us anything that even comes close to replacing them. After all, a screw is just a wedge around an axis and is incredibly efficient. Its efficiency is attested to by the proven engineering fact that over 99 percent of the load against a screw is taken by the first three threads, and the fifth thread is always relaxed. The other threads only serve to introduce the screw into the threaded hole and to keep it aligned during tightening. For this reason, sheet metal screws hold almost as much of a load as a machine screw in a threaded hole.
Suffice it to say, chances are we’ll be using tapped holes on firearms for some time to come, so it can’t hurt to learn as much about tapping and die-cutting threads as we can.
Threads are identified in the English/inch system by number sizes and fractions of inches and a dash separating the diameter designation from the thread pitch, which is expressed in threads per inch. The more common household sizes also have UNC and UNF designations, which mean standard coarse- or fine-thread pitches. These are not very useful designations to a gunsmith, because he must pay very close attention to the exact size of a thread anyway.
Drafting standards organizations are pushing the use of decimal designations instead of the usual number sizes for threads. The American National Standards Institute uses .138-32 THD. for what we more commonly know as a #8-32 thread. The idea of renaming threads meets resistance from almost all quarters from mechanical engineers to the machine shops with which they deal.
There are three generally recognized ways to obtain threads on a shaft: You can cut the threads, roll the threads, or cold-head them. Grinding and die-casting threads are too expensive and too cheap, respectively, and are not often-used methods. There are some electronic connectors that make use of die-cast threads, but this has no application to firearms. Taps and dies are commonly made by grinding their threads, but for now we’ll concentrate this discussion on using, not making, them.
Cut threads are the cheapest and the most common in use today. However, cutting into the metal severs its grain structure, causing some weakening of the material that makes up the threads.
Rolling metal into shape is a more expensive way to thread a device but results in much stronger threads. Think of rolling threads as compacting the metal structure like you would in a forging operation, but using rolled pressure instead of impact. The metal is mashed into the shape by the tap sliding over its surface. This method not only keeps the grain structure intact, but also “cold works” the metal, a process that actually strengthens it. As a result, rolled threads don’t have the acute stress risers and natural split at the extreme of the thread groove caused by cutting threads. Thread-rolling taps are readily available from machine-shop supply houses and only cost slightly more than cutting taps. Be the gunsmith should be aware that they require a different set of rules when tapping, which we’ll touch on shortly.
Cold-heading threads is similar to forging, where the metal is compressed into the threaded shape by an impact between two dies, but the metal isn’t heated before stamping. This is the commercial method used to make the heads on most screws. The metal is stamped under great pressure, filling the cavity of the cold-heading die in the desired shape. Neither the pressure nor the dies are available to the average gunsmith, so we’ll pass over this method with just this mention.
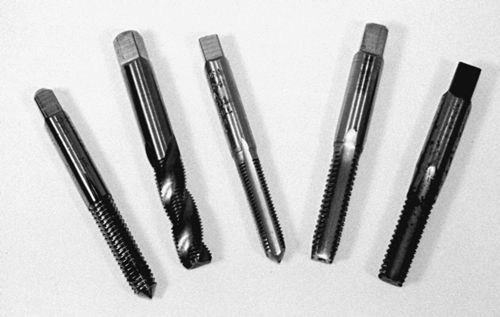
Types of Taps
Thread-cutting taps used to cut female threads into a hole come in three common configurations: taper, plug and bottom. These should do just about anything you’ll need to do.
The taper tap is pointed at the cutting end and gradually tapers to full diameter about a quarter of the way back. The cutting edges are slightly increasing in diameter to shave metal instead of pushing it out of the way with brute force.
The taper tap is used to tap holes where the threads are meant to go all the way through a workpiece, or to start threads in a deep or blind hole. Its shape slightly enlarges the hole to the right size and aligns the tap by seeking center all the time. In blind holes, the threads are just started with the taper tap, and the gunsmith may switch to a plug tap later. The taper is the easier-cutting tap and should be used where possible.
Plug taps are more blunt on the end and have a steeper angle of taper. These taps require more force because they shave the metal off in thicker chips and their bite becomes full more quickly. Use these in holes in which the depth doesn’t allow the use of a taper tap, or as a good compromise, if you can only justify one tap per thread size. Since I use left-hand threads so infrequently, I nearly always buy plug taps in the left-hand version of the thread size unless it is for a specific chore that is to be repeated many times.
The blunt-ended bottom tap is used to cut threads to the bottom of a blind hole or to make full threads go a certain depth without threading any farther. I seldom buy this type of tap because I eventually break the others and just square up the ends to make bottoming taps. I sometimes chamfer the end like the commercial bottom taps, but in most cases I leave the thread-cutting flutes full to the very end to reach nearer the bottom of holes. I use a plug tap before my homemade bottom tap to give it every advantage that I can.
Pipe threads are similar to standard 60-degree threads, the exception being that the threads are in a tapered hole and at an angle with the axis of the hole. With the threads tapered, it is obvious that the depth to which you tap would determine the size of the opening of the threaded hole. While it is possible to cut pipe threads into a straight hole, it is better and makes the tap last longer to cut the threads into a properly tapered hole. The pilot hole for tapping pipe threads is first drilled, then cut to a taper with a tapered pipe reamer. Keeping a pipe fitting of the intended size on hand is a good way to gauge the results.
At its best, tapping tapered threads is not as exact a science as normal straight threading because it is harder to tell when one is through. It is an operation highly dependent upon a good tapping oil to counteract the wedging action of the thread’s taper. I use a good sulfurated cutting oil like that preferred in heavy-metal machine shops to prolong the life of my pipe taps. Pipe threads, by virtue of their normal use, must be more exact and void-free than machine threads to seal off pressure or liquids.
There are almost as many distinct shapes of taps as there are drill bits. Some even have passages in the flutes that allow cutting fluid to flow through and lubricate, cool the cutting edges and flush out the chips. Flute designs fall into four main categories: straight fluted, spiral fluted, two flutes and three flutes.
The straight-fluted taps have cutting edges in straight columns. Others have the flutes spiraled around the core, but this design isn’t as strong and inherently has a weaker core because the tap’s grooves are deeper. This is to allow the cuttings to flow out in long, curly pieces. Three-fluted taps are stronger than two-fluted taps.
If you are just starting out and can’t afford or don’t want to buy all the taps you might need, here’s what you ought to start with. I would buy plug taps in 4-40, 6-32, 6-48, 8-32 and 10-32 sizes to handle threads most common to everyday utility work. Plug taps are a good compromise when you cannot afford to get taper and bottoming taps in all the sizes. It takes a little more care to start plug taps, but a little hard work is necessary without the best of tools.
About a dozen taps and matching dies, taper and bottoming taps so that blind holes can be tapped within a thread’s pitch of the bottom of the hole, will handle most jobs. The sizes I suggest are 4-48, 5-40, 5-44, 6-40, 6-48 and 8-40. The 5-44 tap will come in handy on Smith & Wesson revolver sideplate screws and Redfield scope rings. Quite a few sights and scope mounting bases use the 6-48 size, and some shotgun front sights use the 8-40 thread. It would pay to check some parts books to see what is most common on guns you’re likely to see before deciding which taps would serve you best. I would get these taps in three-flute styles only.
Barrel Tapping Options
No matter how many taps you have, there will be times you won’t have the size required. There are just too many threads out there waiting to ruin your job at hand. When this comes up, I check my self-tapping screws for a possible match. If I find one, I’m in good shape unless the hole has to be threaded very deeply. A good self-tapping screw will do a fair tapping job in most steels and in nearly all of the other metals. If you can’t find a match or the hole must be threaded too deeply, put the job away and call all the machine-shop supply houses in the area.
If all else fails, make a tap for yourself. This isn’t as hard as it sounds if you have a lathe handy and a large enough commercial tap to follow. I make a threaded shaft of drill rod with a major diameter of .002 inches larger than the screw measured, and cut some flute grooves in it with a stone on a Dremel grinder. I polish the edges with a Cratex wheel and usually grind some relief angle to the trailing edges of the interrupted threads so that the tap won’t drag. That isn’t really necessary if the tap doesn’t have to last.
Your finished tap must be heated to a bright red color and quenched in either water or oil. I prefer oil because I don’t want any cutting teeth to break off and possibly get caught in the threads and ruin the job.
Different metals call for specific types of taps so, while each every gunsmith has his own theories and prejudices about processes and tools, we’ll talk about what has and has not worked for me over the past 30 years.
I wouldn’t use the spiral-fluted tap for any metal harder than aluminum, brass or mild steel less than .125 in thickness. Copper and stainless are both gummy to machine. The spiral tap is inherently weaker than straight-fluted taps and, I promise, will break at the least opportune time. Straight-fluted taps are best for almost all cases. The spiral-fluted tap is good where the metal is soft and the hole deep because it sends the cut metal out in long streamers and is less likely to pack tightly with cuttings.
Pilot Holes
The pilot hole for cutting threads is, depending on which machinists’ manual you’re reading, very near or exactly the size of the minor diameter of the thread. The idea is to remove only the metal occupying the space where the thread grooves will need to be, meaning the tap isn’t expected to enlarge the hole at all or there will be unnecessary drag and torque on the tap. Most supply houses have drill size/tapping pilot hole charts available for free. I keep one in my tap drawer, my drill drawer and one on my drill press.
Rolled threads can be induced in almost any malleable metal. You just cannot roll threads into a piece of dead-hard steel.
Since rolling threads moves, instead of cuts, metal around until it looks like threads without disturbing the grain’s continuity, its pilot hole must be of a different size than that used to cut threads. As the grooves are pushed into the sides of the hole, the displaced material must have somewhere to go. The larger pilot hole leaves room for the material to fill. The recommended pilot hole size is usually about the pitch diameter of the thread, a diameter almost halfway between the minor and major diameters of a thread.
Fluids
I use whatever tapping fluid I find on hand when threading steels other than stainless or hardened. In situations like the threading of aluminum, I use special fluids designed for aluminum. There are some brands of tapping fluids that will, believe it or not, make freshly cut aluminum smolder. I learned the hard way when a solid block of aluminum started billowing brown, choking smoke and would not go out with water. I finally had to tap farther and flush out the burning metal. Heed the cautions on tapping-fluid cans when they state “not for aluminum.”
I have successfully used many of the water-thin fluids, but I find myself returning to the thicker sulfurated types when threads really matter to me. The exception to that rule is when I work with stainless steel. Stainless is a bear to machine with any smoothness, and I like my threads smooth. Then I use the creamy stainless-steel tapping pastes like Westlube and Anchorlube. Both are noticeably better than most of the thinner liquids when tapping a stainless or hardened steel.
Last, but not the least effective, is the old machine shop standard, sulfurated cutting oil, the oil which gives the old shops their distinct odor.
Tap Handles
You can drive a tap with many different types of handles. What you use is a matter of personal preference and will usually depend on the job at hand.
I like the T-handle types with a double-stepped chuck that accepts different sized square tap drives. Most of these have handles that slide back and forth to clear objects that always seem to be in the way. These sometimes come with ratcheting chucks, but I begrudge the extra space needed for these chuck’s size. Another commonly used aid is the straight tap wrench. This has two handles that stick out straight, one to each side, with either two opposing, notched blocks and offset handles or sliding blocks inside a closed yoke. These will serve you well and give good mechanical advantage.
Accessories
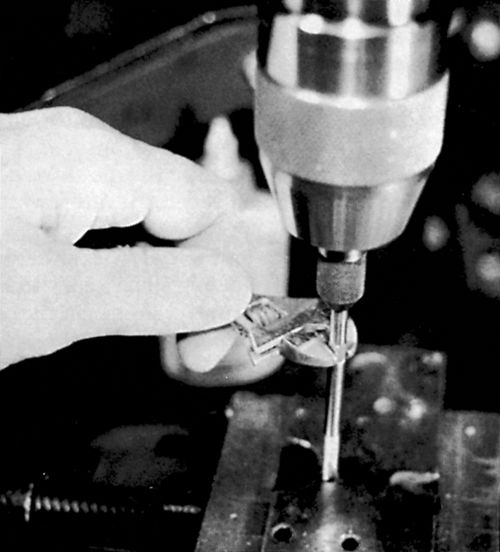
When the job permits, a good gunsmith will use a tap guide to produce threads that are in line with the pilot hole. These guides can be handy when drilling and tapping in a press or milling machine.
I don’t use a tapping fixture, as it is more suited to larger pieces than a gunsmith usually encounters. I just utilize the press with which I drilled the pilot hole in the workpiece and align the tap with that.
A small spring-loaded device called a tap guide is useful for this. After drilling the pilot hole and before moving the workpiece, replace the drill bit with the tap guide. Place the tap into the pilot hole and bring the tap guide down until its spring is mostly compressed by this. There are taps with pointed drive ends and those which are center-drilled to accept a tap guide. The tap guide will usually have a reversible plunger to allow it to be used with either pointed or countersunk taps.
I use the tap guide to ensure that I won’t ruin a good firearm by starting a tap into a pilot hole at a misaligned attitude. This small item might pay for itself dozens of times by saving you the expensive embarrassment of replacing a firearm. I just don’t buy any taps that don’t have accommodations for a tap guide, as I rarely tap without one.
After spring-loading the tap with the tap guide, a small crescent wrench or a tappet wrench can be used to turn the tap. The tap guide will keep the tap co-axial while loading it with force to aid its advance.
The most popular type has a reversible, spring-loaded plunger with a point on one end and a cup on the other. This guide is used after drilling the pilot hole for the tapping operation and, without moving the drillpress head or the workpiece, installing the tap guide into the drillpress chuck. The quill is then extended, compressing the drill guide onto the tap in the hole. The spring-loaded plunger keeps pressure on the tap while also keeping it aligned with the axis of the hole.
Another worthwhile tapping accessory is a tap extension for times you just cannot get an ordinary tap wrench close enough to the area you need to tap.
This is the time you get your money’s worth out of the tap extension you bought. Those I have liked most are just about the opposite of an automotive socket-wrench extension. They have a square socket on the tap end, sometimes with a set screw in it or sometimes with a spring-loaded ball. The drive end is usually square so it can be driven by the same types of tap wrenches that would be used in an easy application.
There are some delightful devices on the market. Most are designed to help tap either more closely to perpendicular, which isn’t particularly applicable to gunsmithing, or to do a lot of tapping more easily, which is. The latter is production work, which we don’t often get, but it helps to have something to hold the tapping end up perpendicular to the surface.
Tips and Techniques
There are widely accepted techniques that have proven themselves over the years and might prevent tap breakage for you.
Taps, while quite hard, nevertheless have some torsional springiness to them. If they didn’t, it would be much more difficult to tap small holes without breaking the tap. It is this torsional feel which guides the amount of pressure you’ll use. Depending on the material, the cutting fluid used and the size of the hole, the tap should be turned about 30 degrees and reversed about the same amount to clear the threads. If the cuttings jam the tap’s way, the resulting threads will look as if they were cut by Lizzie Borden. With each reversal of the tap, advance it to the solid metal again and cut about another 30 degrees and reverse. In all threading with hand tools, be it cutting male threads with a die or female threads with a tap, interrupted advance with some short reversing will help clear the chips and minimize grief caused by trapped particles. This is safer than trying to cut the threads with continuous forward pressure.
I even use roll-thread taps in this manner. If the job is worth my using a roll tap, I feel that I shouldn’t take any chances with it. The very reason I use roll taps dictates that I take unusual precautions in tapping. This brings me to the main difference in the tapping techniques of cutting threads and rolling threads.
While rolled threading is more adapted to power tapping, it can also be done by hand. Roll taps are designed for continuous feeding, but will be lubricated better if you use them like ordinary taps.
There is no advantage in using the lathe to thread a hole unless the hole is in the center of the lathe’s spindle and the piece can be spun about that hole. Otherwise, it is much easier to use a drill press.
I find that there are quite a few times when shafts require a threaded hole in their ends coaxial with the shaft.
Lathe Tricks
The safest way to cut female threads on the lathe is to use the lathe as an aligning device and a tap guide as with a drillpress. The tap guide should be put into the tailstock’s drill chuck and the tap placed between the workpiece and the tap guide. The rest is like the method described for a drill press.
The desire to eliminate the tap guide and use the tailstock to align the tap will come when you get more experience with the lathe. This also leads to wanting to use the lathe’s power to start the tap. I really don’t recommend this, but I’ll admit to being lazy enough to do it fairly often. I also have had to start over on some jobs because I left part of a tap in the metal.
I advise power-cutting threads on a lathe only after considering the consequences if things hit the fan. In power-cutting female threads on a lathe, I usually consider the threads’ function and determine if the pilot hole can stand to be drilled slightly oversize without adversely affecting their integrity. You have to do this because the rotation of the chuck on the lathe cannot stop the way you can when hand-tapping. If the threads are to be utilized to their fullest, I use the recommended pilot-hole size and take more care to keep from breaking the tap.
Install the tap into a three-jaw chuck on the tailstock and firmly tighten the jaws. This operation is not advisable if you have a keyless chuck on the tailstock because they usually self-tighten, and the tap needs to be able to freewheel when it is subjected to overload. Leave the tailstock loose and positioned with the tap close to the hole to be tapped. Keeping a hand on the power switch, turn the lathe on and push the tap into the pilot hole. Watch the tap’s advance and turn the power off when the tap starts spinning in the chuck. If the tap has gotten a good start into the hole, you can be assured that the tap is aligned coaxially with the pilot hole.
Now, lock the headstock spindle and finish turning the tap with a regular tap wrench. The tapped hole is bound to be centered and straight with the axis of the workpiece.
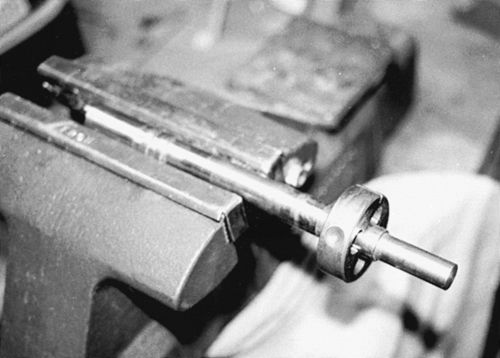
Also, the lathe can be used to quite an advantage to cut male threads onto a shaft using regular tapping dies.
First, taper the end of the rod to be tapped and install a good-sized chuck into the tailpiece of your lathe. Put the tapping die into a straight-handled die wrench and center the die onto the end of the rod. With the die in place, manually push the tailstock toward the die and tighten it down when the chuck face touches the die wrench.
You must be absolutely sure that the drill chuck’s jaws are not sticking out to catch in the die. Turn the die wrench in the proper direction and crank in on the tailstock’s advance crank, using the tailstock to apply pressure onto the die through the die wrench. When you have cut threads for more than five turns, it would be safe to move the tailstock back since the die should have established a straight path along the centerline of the rod.
If threads are to be cut close to a shoulder on a rod, first cut with the die turned the conventional direction, then turn it around to cut close to the shoulder. Remember, the die has a slight funneled side to the thread-cutting teeth and will likely have cutting edges right up flush with the back side of the die. These cutting teeth, which are even with the side of the die, will be able to cut closer to the shoulder. Since the threads cannot be cut exactly up to the shoulder, an undercut is often made next to it at the same depth as the minor diameter of the threading. This will make it possible for the nut or female-threaded part to butt up against the shoulder without having to counterbore the female threads.
Thread-Cutting Dies
While external male threads can be cut onto a shaft with a lathe, the most common method is to use thread-cutting dies. These are cylindrical metal pieces with cutting teeth in the center and relief holes to allow the exit of chips. The thread-cutting teeth are tapered on the starting side of the die to give it a chance to align and gradually start cutting the thread grooves. It is handy to remember that the threads aren’t being cut, but rather the grooves are cut, leaving the threads on a male-threaded piece to fill the grooves in a nut or in a piece with female threads.
Cutting threads with a die isn’t much different from tapping threads into a hole except the threads are out in the open when they clear the die. As with the tap, it is essential to keep the die handles 90 degrees to the axis of the rod being threaded. If the die is started at a different angle, it will often ignore efforts to re-align it and cut deeper and deeper into one side of the rod until you just cannot turn it anymore.
After getting the die started, advance and reverse it after every 30 degrees of rotation to interrupt the cutting and to help clear the relief holes. It is often necessary to back up the die until you can get the relief holes positioned to allow their clearance by air pressure or a pick. If you are using air pressure, it is as important as ever to keep your eyes protected with safety glasses.
Back the die off when finished and chalk up the new threads with regular blackboard chalk, then run the die over the threads again before cleaning them the last time. They will feel smoother in use.
Special Thread Sizes
Some special sizes of threads common to the gun fraternity should be mentioned here. A 7/8-14 thread used on reloading dies is important to anyone making special devices for reloading. I also keep a 7/8-14 tap and die around to clean and true threads, and I use both at least once a month. This particular size isn’t limited to reloading, but since it is not the common household size, the supply houses don’t sell many. That means they are expensive.
Brownells sells barrel-threading dies and receiver tapping taps for replacing or making barrels for the more popular firearms. If you have a lathe and know how to cut threads with a threading tool bit, you won’t really need the dies for revolver- or rifle-barrel threading. However, there may come a time when a receiver tap for Colt, S&W, or Ruger barrel threads in the receiver will come in handy.
My favorite S&W Model 19 had a tight thread in the receiver that made the bore tight through the leaded area. I first noticed this when I ran a range rod through the bore to check its alignment with the chambers. The rod head got pretty tight when it had to go through that area ahead of the forcing cone, so the bullet was swaged smaller than specification and was traversing the forward portion of the barrel. I knew this couldn’t be helping the gun’s accuracy, so I chose to change that fit.
I removed the barrel and cleaned the threads in the receiver. They weren’t very dirty, so I knew the thread diameter must have been the culprit. Using my most prized Boelube ($60 a gallon), I ran the K-frame tap through the front end of the receiver and it came out with some fine high-carbon cuttings on it.
Putting the barrel back on, I ran the same range rod through the bore again. What a good feeling. There was about 0.002 inches difference in the diameter of the bullet pushed through after the operation when it was compared to that bullet pushed through the bore previously. I watch for that in all revolvers now.
If you are asked to install a compensator on an automatic pistol, you will need a die to thread the muzzle end of the barrel. The most common threads for the 1911 are either .575-40 or .581-40. The .575 size is known mainly because it is used by Clark, while the .581 is known because of Brown’s and Wilson’s comps. Since the taps cost $20 to $23 and the dies (which are more often needed by gunsmiths) run $30 to 39.
Not even the luckiest machinist could get by without using some type of guide when threading the muzzle of a barrel for a compensator. If the barrel were tapered on the lathe and the die held plumb to the bore with the tailstock, it would be possible to get the threads aligned on the barrel. But I wouldn’t want to risk it on any barrel worthy of a compensator.
Brownells sells a two-ended barrel-threading guide for .45s and .38s that doesn’t cost an arm or leg. I made mine out of stubbornness, but because I had to make one for my 10mm Omega, anyway, one more couldn’t hurt. If you make your own, I suggest it either be hardened to dead-hard and oiled thoroughly or made soft enough not to damage your die and replace it if it got cut. I chose the ultra-hard route and am careful not to force the die over it. The barrel-threading die is turned to a diameter that will fit into the muzzle for about an inch and a middle diameter over which the die will just barely slide. This center portion ensures that the die will cut threads co-axial with the bore of the barrel.


