


It took better than a year for me to get my hands on a Kahr P45 for this article. That’s because, since its announcement, this eagerly awaited big-bore cousin of the Kahr 9 had a very long list of buyers standing by with their wallets and checkbooks open. It’s been quite a while since the first Kahr was covered here (May 95). Since reprints of that article are no longer available and much of what was written then does not apply to the P45, I decided another look at the Kahr was in order.
First, however, let me say that I was pleased to see that none of the precision found in the K9 is missing in the P45. It remains masterfully made from outstanding materials. Though mechanically locked and unlocked in the style of John M. Browning, it is far more than a mere knock-off of the great man’s design. The Kahr emerged from the fertile mind of Justin Moon, and is covered by no less than six individual patents.
The Kahr has no visible safety, so don’t bother looking for one—Kahr pistols have no externally located safety levers and no grip safety. What makes the pistol safe is inside. A spring-loaded striker block seats into a recess in the striker preventing it from moving into contact with a live round. The block is released only when the trigger has been pulled fully to the rear, disengaging the striker from the cocking cam.
How Kahr Pistols Function
As the trigger is pulled, a protrusion on the cocking cam lifts the striker block to clear the striker. At the same time, the cocking cam pulls the striker rearward to a fully cocked position. The cocking cam releases the striker to move forward when the pull of the trigger has been completed. Recoil from the discharge of the round moves the barrel and slide back. After about 1/2 inch of movement, the camming action of the barrel’s recoil lug and the slide stop/locking pin pull the rear of the barrel down, unlocking it from the slide. This allows the slide to continue rearward, extracting the spent case and ejecting it to the right.
The slide then moves forward under tension from the recoil spring to strip a round from the magazine and chamber it in the barrel, which has been pushed upward/forward to relock with the slide. Nothing unusual there. Most autoloaders work the same way when recovering from recoil. With a Kahr, recovery is compounded when the striker is recaptured and placed under partial tension by the cocking cam.
The Kahr is a defensive, DAO handgun. If you understand how it works from what I’ve stated here, I think you’ll agree there is no way it can be fired unless and until the trigger is pulled completely to the rear.
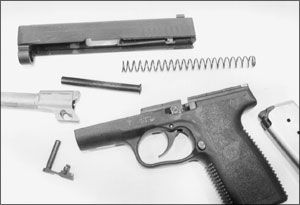
Field Stripping
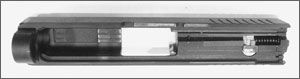
Okay, the magazine is out, the chamber checked and empty. The springs on these pistols are strong, so wear eye protection. The .45-caliber pistol used in this article is a P-Series Kahr pistol. Basic take-down for it is identical to Kahr’s T, TP, CW, PM, and MK series. They all wear two small index marks on the left side of their frames and slides.
Draw the slide back until the two index marks are aligned. There is also a half-moon cutout in the slide. When the two marks line up correctly, you’ll be able to see the inner lug on the slide-stop lever through the cutout. Note that the inner lug must be seen clearly and completely or you will never be able to push out the slide stop. When you are able, push it all the way out from right to left. After that, ease the slide forward, pull the trigger to release the striker, and move the slide forward off the frame.
Now invert the slide, and push the rear of the recoil-spring guide slightly toward the muzzle and lift it clear of the barrel lug. Grasp the lug of the barrel, move it forward a little, lift, and pull it out to the rear.
As previously hinted, there are minor but potentially important differences to be addressed when field stripping a K or PM series Kahr. These are spelled out in the owner’s manual packed with any Kahr pistol. Since owners rarely retain these missives, it wouldn’t be a bad idea if you downloaded one from their website. I think you’ll find the suggestion justified if you consider sight requirements alone. On some Kahr pistols, the front sight looks as though it could be drifted in either direction for adjustment. It ain’t necessarily so. Though a pinned-in front sight hasn’t been used for several years on a Kahr, you could still be handed a pistol that has one.
Check it out by inverting the slide and locating a little hole inside near the front. If the hole is there, a front-sight pin is living under it. Under the pin is a spring. The pin has to be pushed down, compressing the spring, before the front sight can be drifted in either direction.
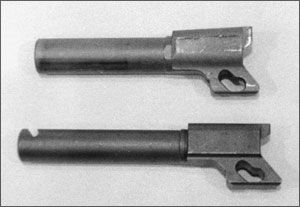
There’s more. A change has been made in the dovetail size in the slides of Kahr pistols. That can set you up for a major goof when ordering factory replacements. Here’s the tip-off as to which slide you have in your hands: Turn it upside down. If you spot a dimple to either side of the striker block, you’re holding a new-model slide. With no dimple, it’s an old-model slide. P45 slides all have a dimple.
I hasten to add here that a pistol entering your shop with tritium sights requires those sights to be drifted right or left using a sight-pushing tool. Night sights cannot and should not be beat upon. They are far too fragile and too expensive to be treated roughly. Brown-ells offers several sight pushers, including a fairly expensive one intended expressly for moving delicate night sights. If you do much work for law enforcement and on personal-defense handguns, though, the investment ought to be recovered in short order.
Detail Stripping the Slide
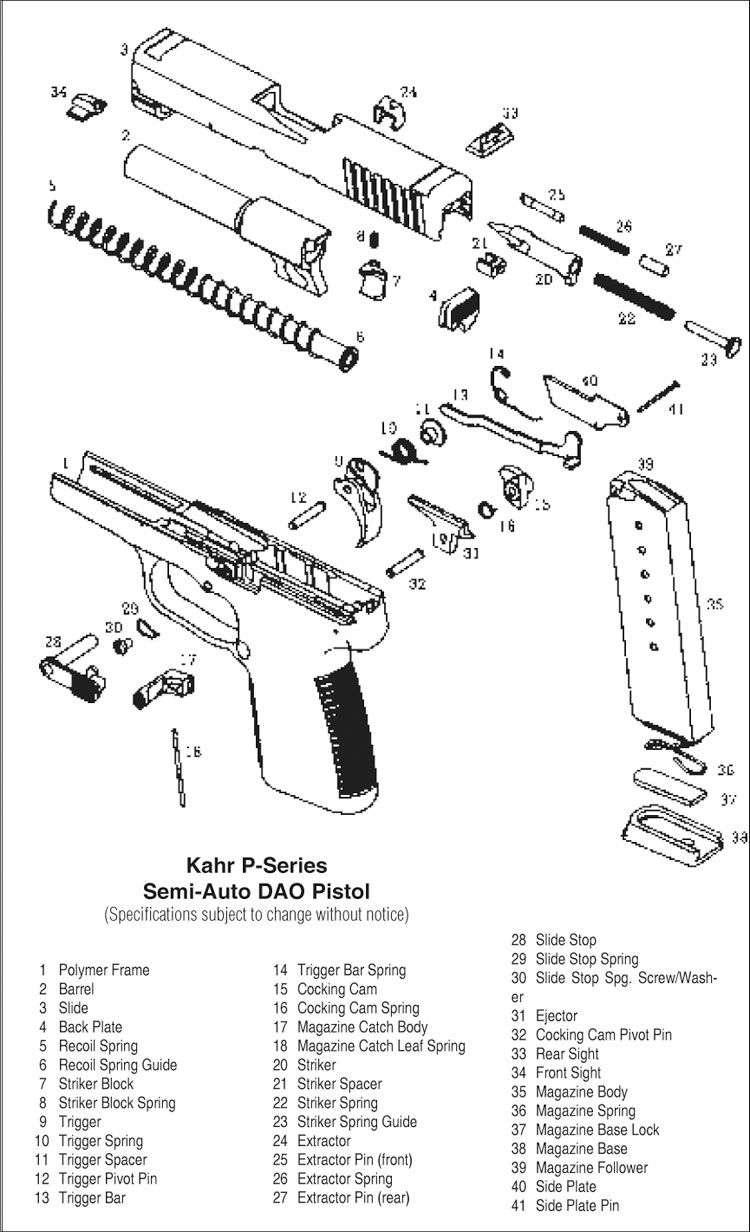
A little bit after getting into this phase, your slide will begin to resemble a porcupine. Turn the piece upside down and slip a small tool between the back plate (#4) and the rear of the striker-spring guide (#23). Push the guide forward to clear it from its plate recess, and leave the tool in place to hold it forward. The extractor’s rear pin (#27) rides in a hole about one-third the way up on the right end of the slide. With a jeweler’s screwdriver, insert it in the opening and depress the rear pin. It won’t move much and it doesn’t have to in order for you to start moving the back plate up enough to trap the pin and recoil-spring guide. Get your thumb over the back plate and keep it there as you remove your tools and push the plate out of the slide. This will not only serve to prevent the loss of parts, it will definitely keep them from gashing your face.
The striker block (#7) is located a little forward of the back-plate slot. Depress the striker block and pull out the striker (#20). Sharply tilt the rear of the slide and tap it on your bench. The front extractor pin (#25), spring (#26), and rear extractor pin should drop out. If they don’t, depress the striker block and try the tapping act again. Still nothing? (You have a really dirty Kahr pistol there, amigo.) You may have to carefully detach the extractor (#24) from the front pin and give the pin a nudge with a dental pick toward the back end of the slide. Eventually, with some solvent added to the tap dancing, all extractor parts will be free. Now turn the slide right-side up, tap again on the bench, and the striker block will fall out. Or should, at any rate.
Detail Stripping the Frame
You’ll need a 1/16-inch cup-pin punch, a jeweler’s screwdriver, dental picks or similar, small smooth-jaw long-nose pliers, a thin/strong length of shim stock or a tongue depressor, a special screwdriver or two (which you will make). And keep reminding yourself that the P45 here has a polymer frame, not a steel one. A steel frame wears grips; a polymer frame doesn’t. If it did, all you’d have to do to get inside the pistol would be to remove the grips. In this case, you have to remove the side plate (#40) and side-plate pin (#41).
Here, you might want to stop and make one of those special screwdrivers. A thin blade is needed into which you will cut or grind a groove wide enough to encompass the shaft of the side-plate pin and bent slightly to fit under the head of the same pin.
Look on the left rear side of the frame opposite the side-plate pin. A very small dimple will be visible. Not the end of the pin, folks, just a dimple. Center your cup-pin punch exactly over the dimple and tap two or three times. Check the opposite end of the side-plate pin. If it has separated from the side plate enough to get your forked screwdriver under it, stop tapping. Carefully pull the pin free of the frame. This should allow the side plate to show you a gap between it and the frame. Slip the shim or tongue depressor under the side plate to about its mid-point. The plate is held in by two polymer tabs. Rocking the flat piece in a mild twisting manner will encourage the tabs to release from the frame and the plate can be lifted off unharmed. This will give you a look at what awaits you. Memorize it, because that’s the way things will have to be after you reassemble the pistol.
Remove the trigger-bar spring (#14) by reaching under it with a dental pick and freeing it from its position in the frame. The trigger (#9) is held to its spring (#10) and spacer (#11) by the trigger-pivot pin (#12).
About that pivot pin just mentioned: On steel-frame pistols, it was made to fit tightly and never shoot loose. On polymer-frame pistols, it showed a tendency to do so occasionally. A corrective measure in the form of a tiny, tiny pin which is seated in an equally tiny groove next to the trigger eliminated the problem—with one caveat: The trigger pin must be driven straight out left to right and straight back in from right to left.
The trigger spring and spacer will probably free up once the pin is removed, and here’s where you’ll need another of those special screwdrivers. Choose one with a blade wider than the entire spacer, then grind an arc in the blade to just fit over the spacer’s raised collar. A magnetic tip would be best if you can manage to part with one.
Once the trigger and its associated parts have been separated from their respective places, remove the trigger bar rearward from the right side of the frame. The cocking cam (#15), cocking-cam spring (#16), ejector (#31), and cocking-cam pivot pin (#32) still face you. The latter is seated in a blind hole, but you can get under the head of the pin with a jeweler’s screwdriver—very carefully—and pull it out. The cam, its spring, and the ejector will fall free. The pin, by the way, is a slip fit. (We should all be thankful it isn’t pressed in or permanently anchored one way or another in the frame.)
The magazine catch in steel-frame Kahr pistols comes apart and goes together like an M1911. The magazine catch in this polymer-frame version is approached in the same manner as the Glock. Reach up inside the magazine well with a dental pick and detach the magazine-catch spring (#18) from the catch (#17). The catch can then be pushed out, but don’t remove the spring.
Reassembly Tips
The striker block is reinstalled before the extractor assembly and is held in place by that assembly and the striker. The front extractor pin has a beveled end which must face away from the slide.
For reinstallation of the trigger assembly, I strongly suggest using both the screwdriver with the cut radius in its blade and a slave pin just smaller than the diameter of the trigger pin. Insert the trigger up through the trigger guard and position it in the frame. Start in the slave pin from the left to hold it in place. Connect the front of the trigger bar to the trigger after capturing
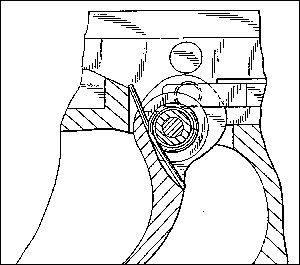
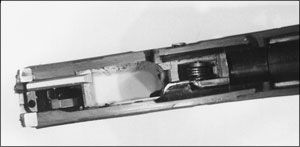
the spacer and trigger spring with the slave pin. The flat of the spacer seats on the bottom of the trigger and the straight leg of the trigger spring points upward. The driver blade with the radius you ground in will be used to lightly press down upon and align the spring and spacer with the trigger-pin hole (see Figure 1). Push the slave pin to be flush with the right side of the frame. Grasp the trigger bar between two fingers of one hand. With free fingers, install one leg of the trigger-bar spring under the end of the bar and the other leg of the spring into its slot in the frame. Place a piece of tape over both ends of the slave pin and another piece over the trigger bar to hold everything in. If you have one handy, an alligator clip makes a reliable improvised tool for retaining the trigger bar while you go to work on the cocking cam/spring/ejector rebuild.
The Kahr’s cocking cam has a small hole on one side. The end of the cocking-cam spring has to fit in that hole or the gun won’t go back together without damaging the spring. After the union has been completed, line up the cocking cam and spring with the ejector, push the pivot pin through them, and reseat the assembly in the frame.
Remove the tape and whatever else you’ve used to retain the slave pin and trigger bar, push out the slave with the trigger-pivot pin, snap on the side plate, and reinsert its pin.
All of this inside work is easier with a steel frame because you can secure it in protected vise jaws, leaving both hands free for the tricky stuff. Using a vise on a polymer frame can be very risky. The P45, however, does have two steel rails inside the frame forward of the trigger guard. These rails would handle a gentle squeeze that’s just enough to keep the frame in one position while you were reconstructing its innards.
When you’re putting the slide back on the frame, it may come to a sudden, unexplained halt. What’s happened? It has run into the nose of the ejector. Press down on the ejector and the problem will disappear.
Because of the slight basic disassembly idiosyncrasies from one Kahr pistol to another, I’ll repeat my earlier suggestion about downloading Kahr owner’s manuals.
These Kahr pistols are precision self-loaders. They all perform very well out of the box, but they all approach excellence after a 200-round break-in period. Regardless of caliber, I’ve never met a Kahr with a feeding, extraction, or ejection problem after it’s been through the break-in period.

