


[Updated August 13, 2018]
In 1870, the U.S. Army contracted with Smith & Wesson to deliver 1,000 of their revolutionary new top-break Model No. 3 revolvers in .44 S&W caliber. The delivery to Springfield Armory of the 800 blued and 200 nickel-plated revolvers took place in 1871. After issuing the new revolvers to the cavalry for a period of field trials, the Army came to the conclusion that the S&W was too complicated and delicate for service use, and decided not to purchase additional revolvers.
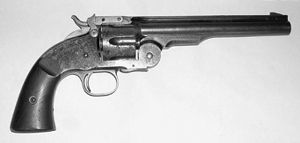
Largely due to the efforts and inventiveness of a U.S. Army major who enthusiastically supported the top-break service revolver, however, the Army returned to the notion of adopting a top-break revolver in 1875, and eventually purchased over 8,000 S&W Model No. 3 Schofield revolvers in .45 S&W caliber. S&W’s Schofield Model 3 used the basic Model No. 3 frame, but with alterations patented by Major George W. Schofield. The Schofield alterations turned the Model No. 3 into a more practical revolver for cavalry use. This was because the barrel latch of the Schofield version could be operated with the thumb of the shooting hand, instead of having to be lifted up with the off-hand like the regular S&W Model No. 3. This modification made opening the S&W barrel an easy, one-handed operation. Schofield also greatly simplified the S&W extraction system, in the process making it more reliable.
Introduced in 1875, the .45-caliber Model No. 3 Schofield is a single-action revolver with a square-butt grip shape. Upon opening the barrel, this revolver, like all S&W top-breaks, features simultaneous, automatic ejection of the spent cases. The Schofield S&W was chambered for .45 S&W, which was similar to the .45 Colt but with a case .1-inch shorter and a bullet weight of 230 grains compared to the 250-grain slug used in the .45 Colt. Smith & Wesson’s .45 cartridge used 28 grains of black powder as propellant, while the original .45 Colt powder charge was 40 grains. It wasn’t long before the Army reduced this and standardized the 28 grain powder charge with a 230 grain bullet in the S&W length case for all .45-caliber revolver ammunition.
In all, 3,000 Schofield revolvers of the “1st Pattern” (or 1st Model were manufactured for the U.S. Army in 1875, with a scant 35 revolvers made for civilian sale. Serial numbers for the 1st Model started from #1 and ran up to #3,035.
Starting in 1876 and built through 1877, an improved Schofield known as the 2nd Model was purchased by the Army. One easily identified feature of the 2nd Model is its barrel catch, which differs from the 1st Model in that it has a flattened, checkered top that was easier to grasp. The barrel catch also used a larger-diameter pivot screw.
The 2nd Models used a stronger base pin that was made with longer threads to help prevent breakage. Also, 1st-Model frames were made of iron and used a removable, hardened steel firing pin bushing, while the 2nd Model frames were made of steel so the firing pin bushing was dispensed with. In all, about 5,285 of the 2nd Models were produced for the U.S. Army, with only 649 manufactured for the commercial market. Serial numbers of the 2nd Model Schofield ranged from #3,036 up though about #8,969. Military versions were stamped on the frames, barrels, and cylinders with a proof “P” and an inspector’s initial, while the U.S. Army grips were marked with an inspector’s cartouche and, on later versions, a production date.
The Smith & Wesson Schofield was and still is a well-liked revolver; in fact, many shooters and collectors consider it to be the best of all the top-break revolvers made by S&W. Among other notable figures, both Jesse and Frank James used S&W Schofield revolvers. In more modern times, there have been no less than three replicas of the Smith & Wesson Schofield. Navy Arms was the first of these, offering a replica 2nd Model made by A. Uberti in Italy. This was followed by the Cimarron 1st Model Schofield manufactured by the ill-fated ASM, also of Italy. And in the year 2000, Smith & Wesson itself produced a limited run of a highly modified Schofield. I prefer to call this a “look-alike,” since it was far from being an exact replica. Both of the imported replicas were offered in .45 Colt and other calibers, while the S&W revolver was offered only in the original .45 S&W chambering.
S&W Model No. 3 Schofield Disassembly Instructions
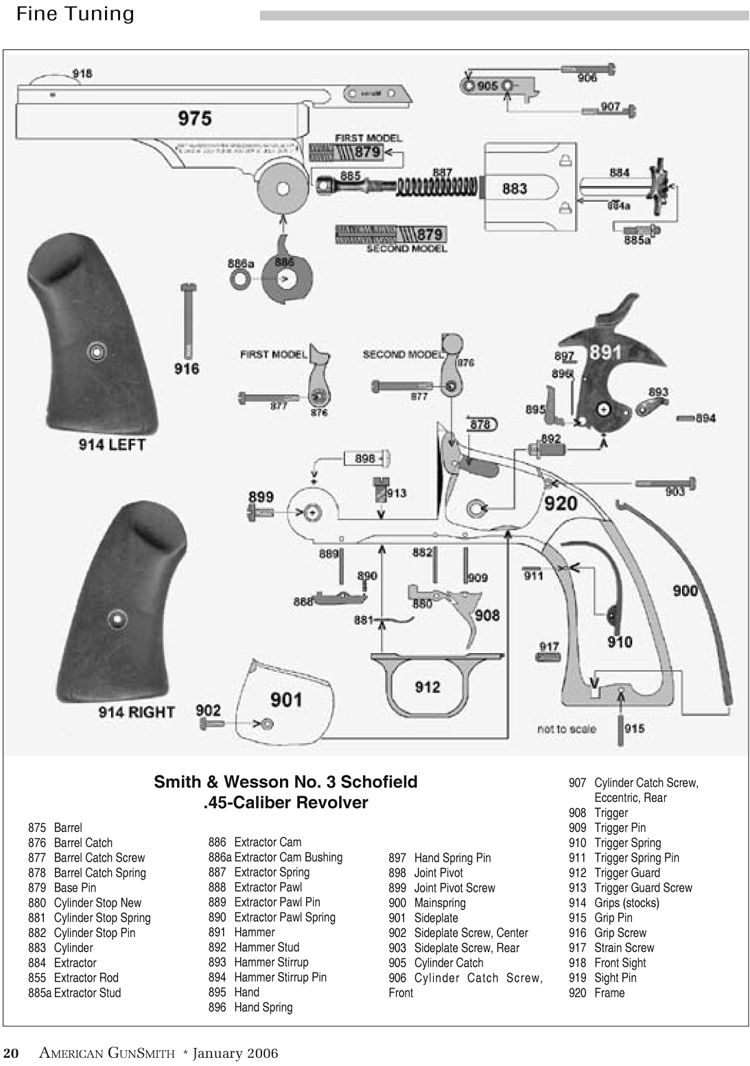
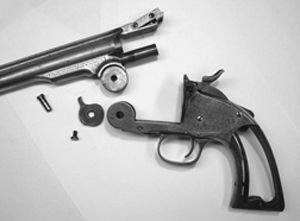
1. Pull the hammer (#891) back one-click, placing it into the half-cocked position. Keeping your finger away from the trigger (#908) at all times, pull the barrel catch (#876) to the rear and tilt the revolver barrel all the way down to open the action. Check carefully to be certain the cylinder is unloaded.
To remove the cylinder (#883), loosen the rear screw in the cylinder catch (#905) about one-half turn. The cylinder catch forms the major portion of the barrel top-strap area and is a separate part from the barrel. Loosen the front screw on the cylinder catch and tilt the cylinder catch up slightly, then pull the cylinder to the rear. The rear cylinder-catch screw (#907) is intended to have an eccentric screw shank that allows the cylinder catch to be tilted up slightly when the screw is loosened about half a turn. If this feature does not function, the screw might have been changed for a screw with a plain shank. If it has, you will have to remove the rear screw in order to tilt the cylinder catch up so that the cylinder can be removed. The cylinder will now withdraw off the base pin (#879) toward the rear.
2. To remove the barrel, remove the joint-pivot screw (#899) from the left side of the hinge on the frame (#920), and use an appropriately sized straight punch to drive the joint pivot (#898) out of the frame toward the right side. Be sure to note the witness mark on the joint pivot and its corresponding mark on the frame for reassembly.
The barrel (#875) is now loose and can be lifted up out of its joint with the frame. The extractor cam (#886) is located between the ears of the barrel hinge, and it can be pulled down and out of the barrel. Notice the removable extractor-cam bushing (#886a) at its center. Make note of the position of the extractor cam for reassembly.
3. To remove the grips and sideplate, unscrew and remove the grip screw (#916) and lift off the grips (#914). Unscrew and remove the barrel-catch screw (#877). Be sure the hammer is in the half-cock position, then withdraw the barrel catch (#876) from the top by pulling it up and to the rear.
Unscrew and remove the two sideplate screws (#902 and #903). Turn the frame on its side, holding it by the hinge over a padded bench top with the sideplate facing up. Strike the grip frame a sharp blow or two using a hardwood or plastic mallet. This will shock the sideplate (#901) and cause it to jump up out of its seat in the frame for removal. Never attempt to pry off the sideplate, as serious damage to the plate and frame may result.
4. A pair of spreader-type pliers is used to remove the mainspring and hammer by compressing the top of the mainspring (#900) so the hammer stirrup (#893) can be rotated forward and out of its seat between the ears at the top of the mainspring. Release the mainspring and loosen the strain screw (#917), which is located in the bottom-front of the front grip strap on the frame. Withdraw the mainspring from the frame side.
Next, carefully rotate the top of the hand (#895) to the rear using a small screwdriver as a lever. While holding the hand to the rear, pull the trigger (#908) and hold it to the rear. The hammer (#891) can be rotated about half-way back and carefully pulled upward, off the hammer stud (#892), and out of the frame. ➝
5. To remove the trigger guard, unscrew and remove the trigger-guard screw (#913) and remove the trigger guard (#912) by pulling down and forward from the front. The cylinder-stop spring (#881) is fitted into and held captive in the guard by a small dovetail slot inside the trigger guard. The spring will slide to the rear for removal.
6. Using a cup-tipped pin punch and hammer, drift out the cylinder-stop pin (#882) and push the cylinder stop (#880) out toward the bottom through its window in the frame, located under the area where the cylinder rotates. (The cylinder-stop pin is the center of the three pins that pass through the frame from side to side.) Again using the cup-tipped pin punch and hammer, drift out the trigger pin (#909). The trigger pin is rear-most of the three pins that pass through the frame. The trigger (#908) can now be pulled out the bottom of the frame.
The trigger spring (#910) is mounted inside the front grip strap and is held in place by a cross-pin running through the grip frame. Drift out the extractor pawl pin (#889), which is the front-most of the three pins that pass through the frame. The extractor pawl (#888) and its spring (#890) can now be removed from the bottom of the frame hinge.
7. To disassemble the cylinder, insert six fired cartridge cases or dummy cartridges into the chambers for support. Push a punch through the hole in the ejector rod (#885), and rotate the cylinder in a counter-clockwise direction to unscrew the ejector rod from the extractor (#884).
8. To disassemble the hammer, rotate the hand (#895) about 180 degrees and pull it out of the hammer. Drift out the pin in the center-front of the hammer that holds in the handspring (#896). The handspring will now slide out of its recess in the hammer. The hammer stirrup (#893) can be removed by drifting out its pin at the rear of the hammer. Notice the position of the stirrup for reassembly.
Reassemble the revolver in reverse order of the above.

