


Savage Arms Company introduced the now-famous Model 1899 lever-action rifle in – not surprisingly – 1899. The new rifle was based on the invention of Arthur W. Savage of Utica, New York. Mr. Savage had previously designed lever-action rifles, one for military trials in 1892 and another, a commercial version in 1895, which was produced for Savage by the Marlin Firearms Company in New Haven, Connecticut. Some 6,000 of the 1895 model were manufactured between 1895 and 1899. Savage Arms Company was formed in 1897, and began producing the rifle themselves in 1899.
Author photos
The Model 1899 is an outstanding and unique design in many ways. It offered an internal rotary magazine that held five shots, along with a very strong and simple lever-action operation. The Model 1899 also incorporated an unusual and thoughtful cartridge-counter feature; the shooter could see the number of cartridges remaining in the magazine by viewing the cartridge counter through a small window on the left side of the receiver. In addition, the new rifle was equipped with a hammer-cocked indicator on the top of the receiver. Another innovative feature was the sliding safety that locked the trigger while at the same time locking the lever in the closed position.
Savage’s Model 1899, or the ’99, as it was later known, has been popular with hunters since it was first introduced. The rifle has been available in both solid-frame and takedown versions, and it was the first commercially available rifle to be chambered for a high-velocity .22 cartridge, the .22 Savage Hi-Power in 1912. A year later in 1913, Savage introduced their now-famous .250-3000 cartridge, which pushed a little 87-grain bullet to velocities of just over 3,000 feet per second. In 1913, this was quite a remarkable feat.
Through its many years of production, the company changed many aspects of the 1899, although the basic design and operation of this sound and dependable lever-action has remained the same. Thanks to its simple, highly versatile action, the 1899 has been chambered in many calibers over its lifetime, including .25-35, .30-30, .32-40, .38-55, .22 Hi-Power, .250-3000, .300 Savage, .303 Savage, .243, .308. and .358 Winchester. Likewise, the 1899 has been offered in an almost uncountable number of model variations, especially prior to 1981.
In the early days, starting in 1909 when the takedown feature was introduced, the 1899 was also offered with auxiliary barrels, often in different calibers and/or barrel lengths. At one time, Savage even offered a .410 shotgun chambering as an auxiliary barrel on some takedown models. The .410 shells would not feed through the rotary magazine, however, so the shotgun barrel was purely a single-shot affair.
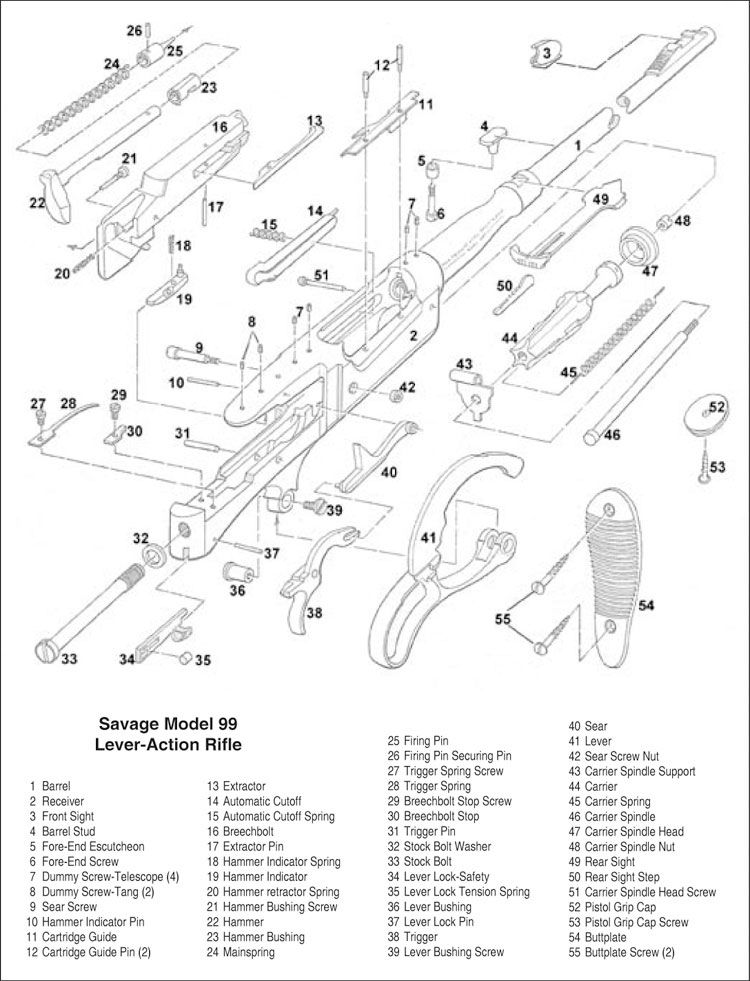
Disassembly Instructions
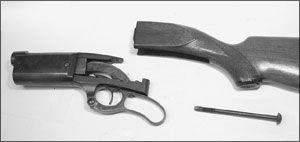
The Savage rifle shown here is a 1950s-vintage Model 99. If you’re working on a 99, you may notice some differences between it and the one shown here, since many small changes were made over its long production life. Nevertheless, if not identical to the ones shown here, the basic components of any 1899 will be very similar.
1. Before you attempt to handle or work on any firearm, always make it a point to be sure the weapon is unloaded. Hold the rifle around the forearm and barrel, pull the safety lock (#34) back into the “off” position, and push down to open the lever (#41). While you do this, be careful to keep your fingers away from the trigger (#38). Look down into the chamber to make sure it is empty. You should look into the cartridge carrier (#44) in the action to be sure no cartridges are present on the left side of the action at the magazine spool.
It’s also possible to view the Savage’s cartridge counter through the little window on the left side of the receiver (#2). The counter should read “0.” If there are any cartridges present in the magazine, partially close the lever (about half-way), just enough to push the cartridge in the carrier forward slightly and allow it to engage the bolt face. Then open the lever to expel the cartridge.
Repeat this operation as many times as required, until there are no more cartridges and the cartridge counter reads “0.” I like to make a habit of removing any live ammunition to a room apart from where I am working.
2. To remove the buttstock and the fore-end, unscrew and remove the buttplate screws (#55) and you lift off the buttplate (#54). Slide a long straight-bladed screwdriver into the hole in the buttstock (not shown) and engage the screw slot of the stock bolt. Push in hard and unscrew the stock bolt (#33). Once unfastened, the buttstock can be drawn off to the rear of the receiver (#2). Unscrew and remove the fore-end screw (#6) and the fore-end (not shown) will be free to be pulled down off the barrel.
For later-model takedown guns, push the takedown latch on the bottom of the fore-end to the rear (on early guns, slide the fore-end latch forward), and tilt the fore-end assembly down off the barrel. Open the lever and unscrew the barrel by hand in a clockwise direction (looking at it from the rear).
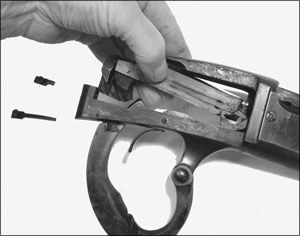
3.Removing the breechbolt begins with unscrewing and removing the breechbolt-stop screw (#29) from inside the lower tang area of the action. Then lift off the breechbolt stop (#30). Right next to the breechbolt stop screw, unscrew and remove the trigger-spring screw (#27) and lift off the trigger spring (#28). Open the lever (#41) and pull it all the way down. With the breechbolt stop removed, the lever opens farther than normal. While the lever is in this position, the rear of the breechbolt (#16) can now be pushed to the left and then pulled back and out of the receiver.

4. To remove the trigger, lever, and sear, use a 1/8-inch pin punch and hammer to drive out the trigger pin (#31). The trigger (#38) will then be free and can be removed. Unscrew the lever-bushing screw (#39) and push out the lever bushing (#36). The lever (#41) can now be removed by dropping it out the bottom of the action. Using a special spanner to hold the sear-screw nut (#42), unscrew and remove the sear screw (#9), and lift out the sear (#40). Be careful that the carrier-spindle support (#43) does not move out of alignment while the sear screw is out.
Reassembly tips: Notice that there is a small “lug” or tooth under the head of the lever bushing. This lug must line up with the corresponding notch in the receiver for correct reassembly. Also, because of the precise adjustment required to reinstall the carrier assembly, I don’t recommend removing any of the carrier parts unless you’re very familiar with the Model 1899—and then only if removal is absolutely necessary.
5. Disassembling the breechbolt (#16) is accomplished by removing the hammer-bushing screw (#21), located at the left rear of the breechbolt. The hammer assembly can now be slowly withdrawn toward the rear. Notice how the hammer-retractor spring fits under the tail of the hammer. It will fall out as you pull the hammer out of the breechbolt, so make note of its position for reassembly later.
6.Disassembling the hammer (#22) begins by clamping the firing pin securely in the jaws of a padded vise. Hold pressure on the hammer in a forward direction and then use a small pin punch and hammer to drive out the firing-pin securing pin. Then slowly ease off the pressure on the hammer. At this point, the firing pin (#25), mainspring (#24), and the hammer bushing (#23) are free and can be withdrawn off the front of the hammer. If you need to remove the extractor (#13), use a small pin punch and hammer to drive out the extractor pin (#17). The extractor is then free to be lifted out of the side of the breechbolt.

Can parts like springs & for the 25-35savage 1899 be found if I needed to replace parts ?