


")


Joshua Stevens was born in Massachusetts in 1814, when the flintlock was still the “King of the Hill” among guns. The “King” ruled until 1830, when the percussion cap dethroned it. In those days, it was customary to learn a trade by serving an extensive apprenticeship, so Stevens worked for a number of years as a machinist’s helper before being hired by Cyrus Allen, a gunmaker operating out of Springfield. There, Stevens’ machinist skills were applied to the manufacture of percussion firearms, until the rimfire era began about 1857.
By 1864, Stevens had secured a patent for his design of a single-shot rimfire tip-open pocket pistol which, when fitted with a long barrel and metal frame stock, served as a rifle. Inappropriately, since no pocket deep enough to swallow it existed, it was called the “Pocket Rifle.” More appropriately, it was better known as the “Hunter’s Pal.” Deciding to make the gun himself, Stevens established a manufacturing facility of sorts in an abandoned flour mill in Chicopee Falls, Massachusetts.
By the time Harry Pope joined the J. Stevens Arms & Tool Co. as a master gunmaker in 1901, the line of tip-open actions included pistols, rifles, and shotguns. All were single-shot including the “Stevens-Pope” Favorite, the #44 – 56 Ideal, the #16 & 16-1/2 Crack Shot, and #14 & 14-1/2 Little Scout. After Stevens’ death in 1907, the dreaded (by all present-day gunsmiths) Visible Loader rifles made their debut, along with the far less troublesome Model 425 High Power lever-action.
Somewhat south of Chicopee Falls a native Jamaican, Arthur Savage, had entered his rifle in the Governor’s Island Military Trials of 1890-92. Savage held strong negative opinions regarding the shortcomings of early military magazine-fed guns, and had patented a hammerless lever-action design of his own featuring an 8-shot rotating magazine within a closed receiver.
Getting his entry built was no small task. Savage had no factory, no staff, and no tooling or gauges. Still, Savage and his business partners managed a face-to-face with John Marlin in New Haven. In spite of the Savage 1892 design losing out to the Krag-Jorgen-sen in the trials, Marlin remained so interested in the Savage rifle that he produced the first batch, plus all the tooling needed to make them in his own factory. These rifles were designated the Model 1895, and the tooling was shipped to Utica, New York. There Arthur Savage, by this time an American citizen, had incorporated Savage Arms and quickly developed a favorable reputation as a maker of sporting rifles with the legendary Model 1899.
Through a somewhat tangled web of acquisitions and management/ownership changes over the years, Savage became the largest firearms manufacturer in the world. Eventually, any influence left from Stevens’ tip-open designs had disappeared, and the 1899 gave way to bolt-actions that led the centerfire line, and in 1960, along came the Model 110. It remains the platform upon which all Savage high-power bolt-actions have been built ever since. Counted among them are this year’s reintroduction of the Savage-Stevens relationship with the Stevens 200.
Fundamentally, the design of the Stevens Model 200 rifle is identical to the Savage 110—with one major exception: The Stevens rifle isn’t equipped with an Accu Trigger and cannot accept one at this time. We’ve covered both the Savage 110 and Accu Trigger in earlier issues. In case you missed the one on the rifle, I’ll go over what you ought to know about the Savage 110 as it applies to the Stevens Model 200.
Basic Disassembly
Since it wears a synthetic stock, the Stevens has no magazine-release escutcheon, a feature present only on 110s with floor plates and wooden stocks.
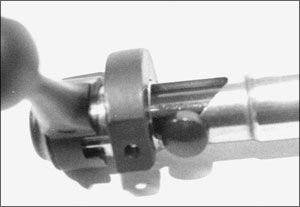
After checking to determine that the chamber and magazine are empty, remove the stock by backing out the front (#19D) and rear (#19C) action screws. Both of these are pillar bedded in the rifle. Open the bolt, pull the trigger, and press down firmly on the bolt-release lever/cocking indicator (see photo on opposite page). Withdraw the bolt slowly, noting how the bolt head (#12K) rides cleanly through its guide slots in the receiver. The head must be similarly aligned when reinstalling the bolt.
Disassembly for cleaning doesn’t get any more basic than this.
Detailed Disassembly
Due to the mere presence of the mainspring (#11D) always wear eye protection when taking down the bolt.
Check the number stamped on the bolt head against the serial number of the rifle. If they don’t match, someone’s pulled a switch. Every Savage rifle leaves the factory with a bolt/barrel relationship assuring minimum headspace, and they wear the numbers to prove it. Mismatched numbers equal a mismatched bolt and barrel and all the problems associated therewith. In addition, the manufacturer will not sell bolts, reserving the fitting of new ones exclusively to its in-house repair staff. Okay, off with the (bolt) head.
Secure the bolt body (#12G) between padded vise jaws. Remove some of the mainspring tension by using a nylon drift to push the cocking piece (#12A) forward and off its cam detent in the bolt body. Back out the bolt-assembly screw (#12S) with a suitable long-shank Allen wrench. Remove the bolt handle (#12C) and rear baffle (#12B).
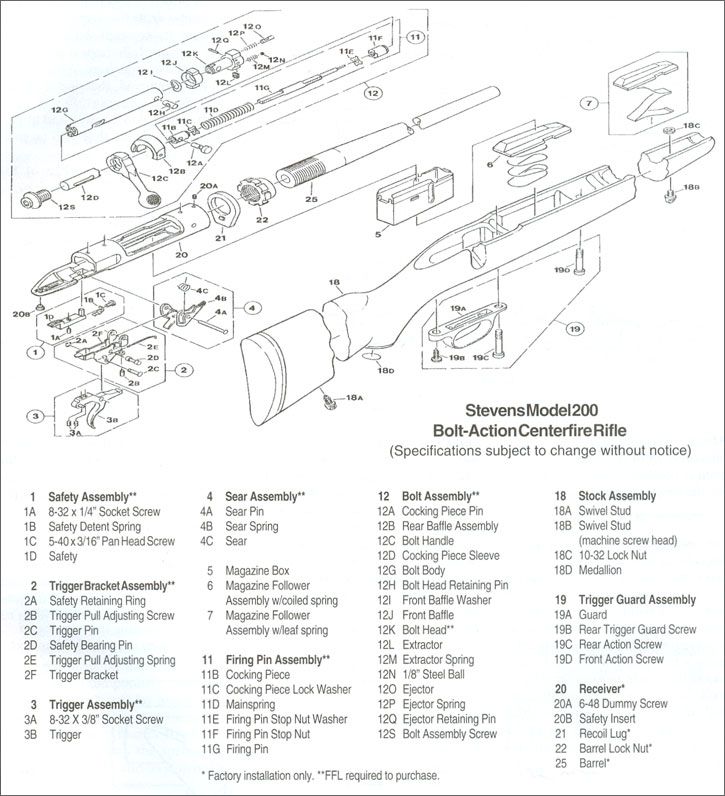
Tilt the bolt to the rear and shake it until the cocking-piece sleeve (#12D) shows itself. Pull the sleeve further out so the cocking piece pin (#11B) aligns with and slips into its rear cutout in the bolt body. Pull the pin out so you can do the same with parts #11C, 11D, 11E, 11F, and 11G, otherwise known as the firing-pin assembly. Use the firing pin itself to push the bolt-head retaining pin (#12H) from the body to free the front baffle (#12J), bolt head, and their friction washer (#12I).
A punch of less than 1/16 inch in diameter drifts the ejector pin (#12Q) toward its crescent-shape recess in the bolt head. Perhaps a plastic bag would be in order here. When the pin is fully removed, the ejector (#12O) and ejector spring (#12P) will make every attempt to fly away and hide. If allowed to do so, they will be most difficult to find.
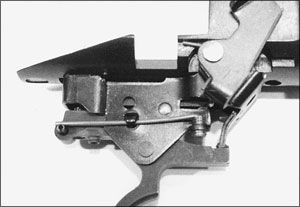
Begin the disassembly of the Steven’s firing mechanism by looking closely at the front end of the bracket (#2F). The sear pin (#4A), spring (#4B), and sear (#4C) are all located inside the bolt release/cocking indicator. All these parts are retained by the sear pin, which runs through them and the receiver. You’ll notice that one end of this pin is obviously larger than the other. The sear spring is located just under the pin’s large end. Retain the spring and drift the pin toward that large end. Tilt the bracket down and slide it forward off the receiver. The safety assembly (parts #1A, 1B, 1C, and 1D) will accompany it and can be lifted off as a unit. I’ll return to the safety shortly.
Prior to drifting out the trigger pin (#2C), pop the clip off its small-diameter end, then back off the trigger-pull adjustment screw (#2B) to lessen tension on the trigger-adjustment spring (#2E). As long as you’re in the vicinity of the spring, notice how it fits under the tab on the bracket, over the roll pin at the rear of the bracket, and in the trigger-adjustment screw. So how must the spring be reinstalled? Under, over, and in. Not necessarily in that order.
Now back to the safety. If it functions smoothly and smartly, leave it alone. If it has a little too much vertical play, you can firm it up. Inside the safety assembly are a detent spring, pan-head screw, safety, and an 8-32 socket screw. Tighten this screw slightly to eliminate any slop. Checking out this corrective measure might require a few reassemblies of the trigger mechanism and will require reattaching the bracket to the receiver. It’s worth the effort, however. (We never return a gun to its owner in unsafe condition.)
To bring up another safety factor: A slam fire is possible due to excessive protrusion of the firing pin. Factory specification for pin-beyond-bolt face is .050 inch to .062 inch. In the Stevens Model 200, forward movement of the firing pin is under the control of its stop (see “A” in the accompanying drawing). A quarter turn of the stop adjusts the pin .0089 inch in either direction, after which the combination washer/firing-pin stop nut is turned in to secure the stop in position.
Though not overly strong, if the mainspring gives you heartburn when making protrusion adjustments, get rid of the pin temporarily. Getting it back on doesn’t call for much compression—just enough to thread on the cocking piece four or five turns. Do this as you keep the spring, the firing-pin stop nut, and its stop nut in touch with one another.
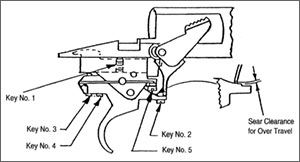
Also, the Stevens’ plain vanilla trigger can be adjusted somewhat for sear engagement, pull weight, safety backlash, and over-travel. You don’t need stones, special files, or fixtures. All it takes is a small driver and a look at the trigger-adjustment drawing. With the bracket and all it contains attached, the gun is cocked and locked. Key #2 in the drawing identifies the trigger-engagement screw. Turn it in until the sear releases. Back off the same screw at least half a turn to establish an absolute minimum .015-inch sear/trigger clearance. Recock the rifle and check the safety for looseness. If present, adjust the safety screw (Key #3) to eliminate it.
Immediately forward of the safety screw is the trigger-travel adjustment screw (Key #4). After making this adjustment, double check that the .015 minimum sear/trigger clearance remains when the trigger is depressed. The final screw in the mix (Key #5) increases or lessens tension on the trigger-pull adjustment spring, but I remind you that the factory specified pull weight is a minimum of 4 pounds.
In my opinion, a smooth, crisp release of the firing pin at that weight makes for a great way to put meat on the table. And a safe way.
Comments on Reassembly
I seriously doubt you’ll encounter an old-style Model 110 sear spring in the Stevens. The old ones incorporated a bushing and you’d be advised to radius the end of a blade screwdriver to fit the coils and use it as a “pusher” when reinstalling them.
The spring on the rifle I used in preparing this article had no bushing, so I adapted a technique J. B. Wood suggested in Gun Digest’s book of disassembly/reassembly for centerfire rifles: Insert a parallel drift punch through the receiver’s sear-pin hole from the left, stopping it short of passing through the cocking indicator/bolt release to allow space for the sear-spring coils. Compress the spring slightly, and insert it from the rear with its legs facing forward. A second punch is inserted from the right to lever the coils into alignment with the parallel punch, which is then pushed through the cocking indicator to capture it and the spring. In turn, the sear pin—small end first—is used to displace the parallel punch.
Finally, after remounting the action, to avoid incorrect operation of the rifle, make certain there is no contact between the trigger assembly and the stock.


