


Don’t think this little lightweight is skimpy on quality. No, it doesn’t have an AccuTrigger or a stainless barrel, and yes, it does have a polymer stock. But otherwise, it’s just as well made as the higher-end Savage Model 93 that we featured in the November 06 issue.
The Stevens Model 310, chambered for the .17 HMR, is one of a series of four rimfire rifles. Of the other three, the Model 300 and the 315 are both chambered for the .22 LR, while the Model 305 is for the .22 WMR. All four disassemble in the same manner, but each rifle’s bolt has been factory fitted to the action. If you ever have more than one 300-Series model in for service at the same time, be sure you keep the bolts separated, temporarily marked with the gun’s
300
serial number, and be sure the right bolt goes back in the right rifle.
Before we get started, I have one complaint about the 300 Series. Actually, my complaint is not with the rifle, but rather with its owner’s manual. This manual is the first one I’ve come across that doesn’t tell the owner how to remove the stock from the action. Perhaps someone in the legal department came to the conclusion that removing a stock could lead to litigation. Doing so isn’t rocket science, of course. And, of course, I’ll tell you how to do it.
Field Stripping
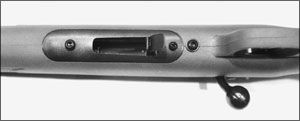
After the usual check for an empty chamber, pull back on the retaining spring (#49) and remove the magazine. Move the safety to the rear (fire) position, open the bolt (#5), pull on the trigger, and slide the bolt from the receiver. Two stock screws (#21) are turned out to separate the action. (Pure rocket science, to be sure.)
This is as far as you have to go for basic cleaning. Even if you have to use some heavy-duty brew to get the lead, copper, or other impacted fouling out, there’s no chance it will melt down the stock if the stock is sitting on the other side of your bench.Detailed Disassembly
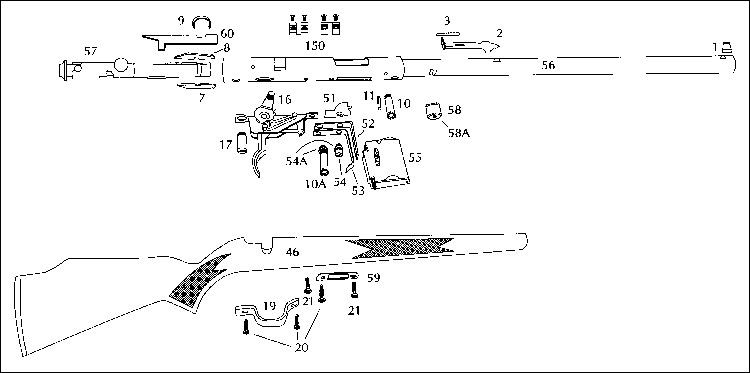
The bolt is not shown in its entirety on the schematic. Missing are the contents of its back half. Before going in after them, turn the bolt over so the flat on its front end faces you. Insert a small-blade screwdriver between the extractor-spring clip (#9) and the bolt body. Spread the clip a little by giving the driver a gentle twist, and then push the clip upward and off. As you remove the clip, take note of how it fits into the rear notch in the bolt head. When reassembled, it must fit back in the same way. Otherwise, the
300
clip can’t do its job.
Once the clip has been cleared, the firing pin (#6), extractor (#7), and cartridge guide (#8) can be taken out to the front. Keep track of which is part #7 and which is #8.
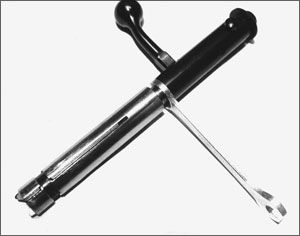
Secure the front end of the bolt between protected vise jaws. Rotate the cocking knob counter-clockwise to disengage the integral stud from its bolt notch, thereby uncocking the bolt. You’re about to discover what’s hidden inside the bolt rear.
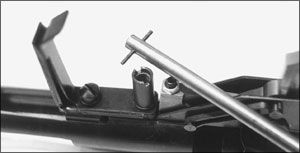
Pull back on the cocking knob until you see a nut. That nut retains the striker assembly. It has to be unscrewed. This is done with a 3/8-inch open-end or adjustable wrench. There’s just one problem. No open end or Crescent wrench of normal thickness will fit in the gap between the nut and front of the bolt. The solution is to use a 3/8-inch wrench from an automotive ignition set. (After discovering this for myself, I was told that is precisely what the factory uses when working on the Series 300 bolt.)
Slip the wrench over the nut and ease the cocking knob forward to trap the tool between the bolt halves. By retracting the cocking knob slightly, you can now begin unscrewing the nut and the striker assembly. Keep using the wrench until finger power can completely undo the assembly, then pull it, nut still attached, from the bolt.
Now find a large clear-plastic bag. Why so? A C-clip retains the
300
mainspring on the striker. Failure to work within the plastic bag when you pop off the C-clip is an invitation to spend the rest of the day looking for the spring, striker, and nut. You’ll need the bag one more time during reassembly. This step requires the spring to be somewhat compressed and remain so when reinstalling the C-clip and starting on the nut. It’s testy.
So much for the disass embly/reassembly of the bolt’s back end. When reassembling the front end, don’t install the firing pin, extractor, cartridge guide, and extractor clip in that order. It’s possible, but you might damage the clip. Instead, insert the firing pin and put a little squeeze on the clip before pushing it into its bolt slot so you get a tight fit. Slip the extractor and cartridge guide into the bolt individually until they are stopped by the clip, then push both parts back simultaneously until they audibly click into place.
Oh, lest I forget: Once the bolt is reassembled, it must be recocked. If you fail to remember this—as I did— the bolt will not slide back into the receiver.
The trigger assembly deserves special mention. As stated previously, this rifle is not equipped with an AccuTrigger, nor can it be readily converted to accept one. As not stated, until now, the assembly can be removed from the receiver, but easy it isn’t. The trigger-housing screw (#14), stock-assembly stud (#10A), and rear stud (#17) are torqued in very tight. I suspect they’ve been further secured with thread sealant. I applied medium heat to the screw/stud heads (not the housing) with the tip of an electric soldering iron. The screws loosened, but I should warn you to use a well-fitting hollow-ground bit on a long shank driver to back out #17.
You’ll need something else for the stock-assembly stud, which I advise you to make yourself. This part is internally threaded to accept a #21 screw. The threads are recessed about 1/4 inch down from the outer walls of the stud, which are considerably thinner than the stud body due to slots having been cut into their rim. Even the best fit between those cuts and a driver blade concerned me
300
greatly. There was a chance the rim of the stud would crack under the twisting. To prevent this, I opted to fabricate a spanner.
Starting with a length of drill rod slightly larger than the cavity of the stud, I turned one end of the rod down to .090 inches. It then entered the stud and stopped above the threaded area. After marking the rod at that depth, I cut 5/8 inch off the end of a .060-inch-diameter Allen wrench and drilled through the rod to accept it. The .060 pin fit the stud slots perfectly, and by grabbing the top end of the remaining 7 inches of drill rod with locking grips, I was able to remove the stud without further difficulty. And undamaged. This same spanner rig can be used if and when the front stud (#10) needs to be removed or replaced.
By the way, there are washers (#13 and #15) under the trigger/magazine housing screw and stock-assembly stud. Don’t let these get mixed up, which shouldn’t happen unless you have to remove the magazine housing (#48).
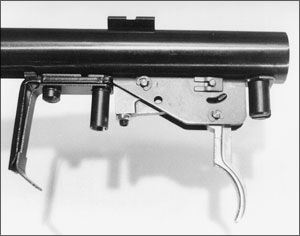
As you can see from the photo, there are assorted clips on the outside of the trigger housing. In the same photo, please note the nut affixed with epoxy. For lack of a better definition, I’ll call it the “striker-engagement adjustment nut” or “trigger/sear adjustment nut.”
Now, about those clips: I recommend against removing any of them. They’re all attached to pins. The pins retain the internal
Stevens Model 310 Bolt-Action Rimfire Rifle
700
components of the trigger system including the safety, and no drawing is available to identify or define their relationships. In any case, you don’t have to take down the trigger assembly to smooth out the trigger and speed up lock time. How, you ask?
Remember when you took out the striker? High polish it and the interior of the bolt body before reinstallation. Do the same with the firing pin and its slot at the front of the bolt. Lightly lubricate all polished surfaces with an oil containing molybdenum disulfide. Order in some Brownells 555 Gray and 555 White Polish. While waiting for them to arrive, go out and purchase 200 rounds of .17 HMR. (You may not need to use all of it.)
In an upcoming issue, I’ll go into more detail on this “break-in”
300
technique and tell you how it came about. In the meantime, with this short version, you can try it on the Model 310 if you get a chance. Start by smearing the gray polish on the striker-engagement area of the trigger and as much of the internal assembly as you can get at through holes in the housing. A toothpick works well for this. Then reattach the trigger assembly and stock to the rifle and fire 50 to 100 rounds. Remove the bolt, detach the housing, and flush them out with white kerosene or mineral spirits. Then blow everything dry with compressed air.
Now substitute 555 White and repeat everything you did with the 555 Gray. My experience says that at about 75 to 100 rounds into the “white phase,” you’ll notice the pull definitely feels lighter. It can be safely assumed this will be accompanied by lessened lock time, although I lack the electronics to measure lock time, and I’m betting you do, too.
Now clean up the rifle, make out your bill (including the ammo), and give the rifle and the bill to your customer. You’ve done a good job. He’ll be back.

