


The platform for this popular clay-pigeon destroyer has been around since 1987 when Remington introduced its Model 11-87. In case you’re not familiar with it, the shotgun featured a new gas-compensation system requiring no manual adjustment for firing intermixed or separate loads from low-brass 2-3/4- to 3-inch Magnums.
This unique system was not included on skeet or trap models. The logic for this was based on a belief that it was highly unlikely that clay-target shooters would enjoy discharging 50 or 100 rounds of Magnum shotshells. The trap gun wore a trap stock and a 30-inch barrel with trap full, trap extra full, or super full screw-in RemChoke constrictions. The skeet model had a 26-inch barrel with skeet and improved skeet RemChokes. Both models delivered their optimum performance with 12-gauge target loads and had two #32 drill-size-diameter gas ports.
Field Stripping
The chamber and magazine are empty and the safety is engaged. Unscrew the magazine cap (#58). Slide the forend to the front and off the magazine tube. Remove the gas-cylinder collar (#46). Grasp the barrel in front of the gas cylinder and pull it from the receiver. Next slide the barrel seal (#12), piston (#66), and piston seal (#67) from the tube.
Now commit this to memory: Whenever the action is open with the barrel removed, you don’t want to allow the bolt to slam forward. Instead, control its motion by holding onto the operating handle (#63).
Moving on now, pull the operating handle out of the bolt (#13). Press the carrier release (#29) and push upward on the carrier (#17). Insert a finger into the ejection port and hold down the feed latch (#39). Pull the action assembly free of the receiver and magazine tube, lift the bolt assembly from the action-bar assembly, and replace the magazine cap.
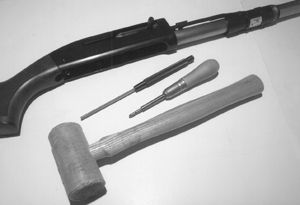
Tap out the two trigger-plate screws (#88 and 89). You can start them with a standard drift punch or M1911 mainspring-housing tool, but you’ll have to finish them off with a parallel drift as pictured here. Neither the standard punch nor the mainspring-housing tool are long enough to push the pins completely out of the receiver. Lift the trigger-plate assembly by its rear to remove it from the receiver.
Detailed Disassembly – With Reassembly Tips
Action Bar Sleeve. Insert a screwdriver into the slot of the sleeve (#2) behind the action bar (#1) on one side of the sleeve. After carefully prying that side away from the sleeve with one hand, grasp the bar and rotate your other wrist to free up the opposite side of the bar for removal. When reassembly time arrives, engage one side of the bar and tilt it over the sleeve. Tap the other side down into engagement with the sleeve, taking care to avoid any damage to the bar.
Slide-Block Buffer/Operating-Handle Detent System. This need only be taken down to replace worn or damaged parts. Drive out the return-plunger retaining pin (#69) right to left. Hold on tightly to the plunger and pull it from the block (#79). The operating-handle detent ball (#64) and its spring (#65) will slide out of the block when the action bars are tilted downward. If you ever have to replace a buffer, insert the new one fully into the block, then drill through the buffer with a .078-inch-diameter drill.
Breechbolt. Number 13 on the schematic, the breechbolt is the primary component of a vital assembly. To take it apart, drive the firing-pin retaining pin (#41) at the rear of the bolt downward. Pull out the breechbolt buffer (#14), firing pin (#40), and its retractor spring (#42). Force the extractor plunger (#37) to the rear until the front claw of the extractor (#36) can be pivoted in toward the bolt face. This will allow the rear of the extractor to be pushed upward (with a small tool) past the plunger. The extractor, plunger, and spring (#38) are all removed to the front of the bolt.
Installing a fresh breechbolt buffer is similar to the replacement of a slide-block buffer. Drill through it, this time using a #24 drill. Also be certain the firing-pin retaining pin is reinstalled flush with the bottom of the bolt.
Magazine Components. Examine the tube to the rear of the cap threads. On this model, there are visible detents or “dents” present. Unscrew the plastic magazine plug, but keep a couple of fingers standing by to prevent the possible escape of the magazine-spring retainer (#61). Keep the end of the tube covered with your fingers, slip a screwdriver between them, and insert its blade into the retainer’s slot. Push the retainer into the tube, turn it 90 degrees, and slowly release it to move upwards. Pull out the spring (#60), tip the tube downward, and the follower (#58) will fall free.
In reassembly, the follower goes back in first. Now you have to argue with the spring. When you have it almost inside the tube, slip on the retainer. Align the tube and retainer detents, push the retainer into the tube about an inch, and turn it 90 degrees to lock up the related detents. It’s wise to maintain control while easing off on the retainer just to make sure the lockup has been accomplished. Having the retainer and spring strike you from the tube like some angry Cobra doesn’t feel real good.
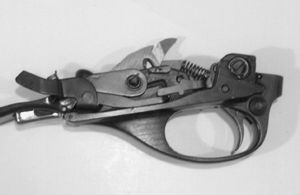
Trigger-Plate Assembly. Before getting into these instructions, I’m obliged to mention that factory service is required for all trigger-related problems. You may not be able to get a part, although you can get a complete assembly. Having alerted you to this circumstance, I’ll continue.
When working with this assembly, some manuals advise the hammer (#48) should be cocked and the safety engaged to prevent an unintended tug on the trigger from releasing the hammer to smash into the front end of the trigger plate. I prefer to ensure this can’t occur by disengaging the safety, thumbing back the hammer, pulling the trigger, and easing the hammer to its fired position. An additional benefit from this action is the lessening of tension on the assembly’s various springs.
Starting with the carrier components, slide the trigger-plate detent spring (#86) off the carrier-pivot tube (#28). Depress the carrier-dog follower (#22) to prevent it from popping off the plate. Push out the carrier pivot, pull the carrier latch (#24) to the rear, and disengage the carrier group from the trigger plate.
You can take this assemblage down still further for part replacement or repair by drifting out the carrier-dog pin (#20) to the inside of the carrier. The carrier-release spring (#31) is taken off by disengaging its bent (front) end from the carrier and pushing the spring to the rear.
The carrier release (#29) operates two ways: manually or when struck by a round being fed back from the magazine. The carrier-release pin (#30) is swaged at both open ends to maintain a snug relationship with the carrier. It’s best to have a new replacement on hand that you can re-swage after installation. If not, at least re-swage the original.
Press the carrier-latch follower (#25) down to release it as you push out the carrier-latch pin (#26) when removing these elements from the trigger plate.
As for the rest of the plate, grind or file the staked end of the hammer pin (#49) until it’s flush with the hammer-pin washer (#50). Drive out the hammer pin and leave your drift in place. (If the hammer is cocked, pull the trigger and ease the hammer forward before proceeding.) With the hammer uncocked, remove the hammer plunger (#51), its spring (#52), then withdraw the drift and remove the hammer. Note: A new hammer pin will be needed for reassembly. It must be staked to make certain there is minimal play with the disconnector. Also note that the bent tail of the disconnector (#35) must be located under the left connector (#32). Overlook that and you’ll transform an autoloader into a single shot—instantly.
The link (#56) is susceptible to damage and can be replaced. Long-nose pliers are your tool. Reach into the receiver from underneath and grab the link just in front of the action-spring follower (#4). Squeeze the link tails together, pull them away from the follower (forward), then carefully twist to dislodge the leading edge of the link from its ledges under the ejection port before withdrawing it.
The interceptor latch (#55) fits over its receiver stud and is held there by its retainer (#53). Spread the tabs on the retainer to release its hold on the stud. Disengaging the latch spring (#54) from the latch frees the latch from the receiver. When replacing or reassembling, position the latch so the recess of its stud hole is staring at you, its hooked end is facing forward, and the small numbers on its tab are upwards. Fit the top of the latch spring into its groove at the rear of the latch, and push the latch down against the inner wall of the receiver. Spread the tabs on the retainer and press it down over the stud. The stud has a groove. The retainer should audibly snap into that groove.
The Remington’s feed latch (#39) or shell latch has two holes that correspond to the trigger-plate pin holes and is staked into its channel in the receiver. The proper gauge for the latch is marked on its rear flat. Drift the latch rearward in its channel to disengage it from the staking. If it sticks, tap it through a trigger-plate hole and it will drop into the receiver. For reinstallation, the latch holes must be aligned with the trigger-plate pin holes and it must be re-staked. A staking tool very similar to that used at the Remington Armorers School is available from Brownells. You’ll be needing it.
Such things as the magazine tube, action-spring tube (#7), barrel stud, and interceptor latch stud are either brazed or projection welded into the receiver during the manufacturing process. Enough said.
Conclusions
A top-of-the-line trap or skeet gun tends to become a pet. The gun’s owner will place it carefully in a case during transit and will guard it possessively while it rests in a rack with other shooters’ shotguns awaiting the next round. Most of those shooting at clay birds do so to sharpen their skills when stalking afield after live ones. For these real hunts, they invariably use a shotgun other than the one they’ve favored for the practicing. That field gun will not shoulder, point, or feel like their “practice” gun.
This brings a question to my mind: Why would a hunter, target shooter, cowboy-action or IPSC fan practice with one firearm only to enter the woods with another? This doesn’t make sense to me. Why not use the same shotgun that brings down the fake birds to bring down the real ones? Is it fear of scratching the stock? Or the possibility of having a pricey smoothbore rained upon? Probably, although there’s no sound reason why this particular trap & skeet gun would be any less effective afield as it is on the range of a private club. It does, however, require a major alteration to achieve this equality. That’s right; you guessed it: Change the barrel.


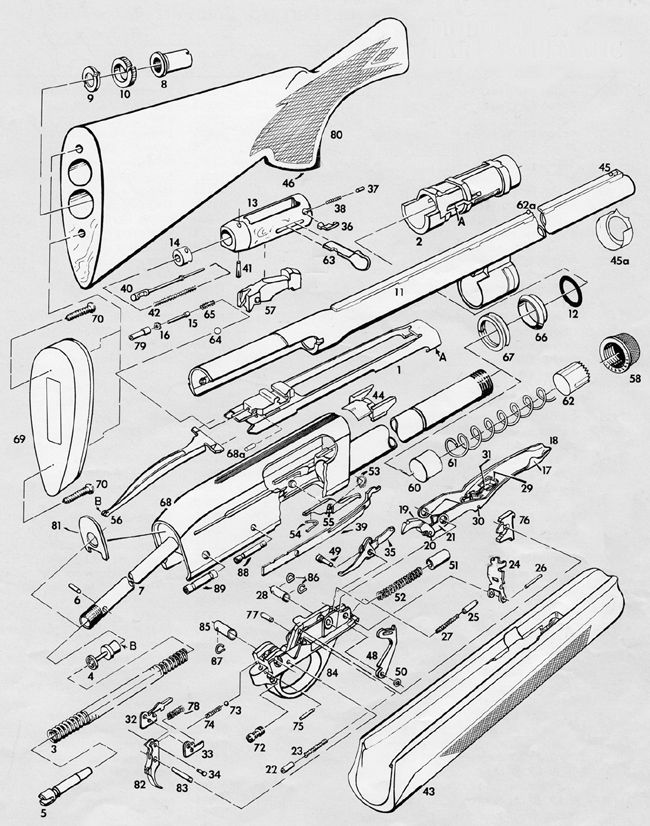
I have a Remington 12 gauge Premier 11-87 Looking at the diagram above I need the two caps and spring ( does this also require a plug ?) Looking at diagram looks like I need a number 60 61 and 62. Can you help ?
As with anything , condition is everything .
I recently did some trading with a friend of mine . Remote control car for a Remington 11-87 . It’s in pretty good condition.
What type of price would it be valued at ?