


")


[Updated October 25, 2018]
The first Remington Number 5 bears no resemblance to the new Remington Model 5. The two rifles differ as much as cats and dogs do. The old Number 5 was a rolling-block sporting and target rifle adapted to use smokeless powder ammunition. It was introduced in 1898, initially chambered for .30-30 Winchester, 7mm Mauser, .30-40 Krag, with .303 British added a few years later. The rifle flopped. Only 198 were sold before it went out of production in 1903. That was too bad for Remington but a good deal for anyone who owns a Number 5, as it would be a mighty nice collector’s piece today.
I don’t think the new Remington Model 5 will suffer the same fate as the old Number 5. Right now, it’s a clip-fed bolt-action available in .22 LR and .22 WMR. I have few doubts that in the future it will be able to handle one or more of the .17-caliber rounds gaining popularity. While it wears “Remington” on its box and at the rear of the receiver, you’ll find “Zastava-Serbia” above and forward of the magazine housing. Zastava is the town; Serbia is the country – formerly a part of Yugoslavia but an independent republic since 2006.
Indulge me while I tell you some more about Serbia. It’s where World War I got started. In 1914, the Austro-Hungarian Empire’s Arch Duke Ferdinand was assassinated in Serbia by an act-alone nationalist fanatic. Doubting the man was flying solo, the Austro-Hungarian Empire took great umbrage and struck back. The Serbs fought them to a standstill until Bulgaria and the Germans decided to reinforce the Austrians. The Serbians were soon overrun. Much later, during World War II, the Serbs allied themselves with the guerrilla forces of Draza Mihailovic, giving their Nazi occupiers serious fits until Marshall Tito arrived to unite Serbia, Bosnia, Hercegovinia, and Macedonia as the Yugoslav Republic.
Just in case you don’t find this kind of history very interesting, I should point out that Serbia and its people are known worldwide for the high quality of the civilian and military weapons they produce. Firearms made in the little republic have been imported for decades to this side of the pond, and fill the inventories of sporting-goods stores from coast to coast. That many of those guns or parts for them are no longer readily available is no fault of their makers.
In seeking to offer an economical but very high-quality rimfire rifle, then, it seemed to the folks at Remington that utilizing the talents available in Serbia would be the wise thing to do. As I understand it, the components are manufactured in Zastava, Serbia, while the assembly is done in the U.S. This was also a smart decision, since import duties on complete firearms range from high to ridiculous. Those costs would have to be passed along to the ultimate consumer, and the rifle wouldn’t have wound up being as reasonably priced as it is.
Now, how about the quality? I found no complaints with the quality of the rifle itself. Unfortunately, there is nothing good that can be said about the quality of the schematic in the owners’ manual. Not only is it so fuzzy as to be virtually unreadable, with all the parts numbers seriously obscured, but it contains some significant errors and omissions. For example, the forward trigger-guard retainer (#38) is identified as a “screw,” and there is no sign of (or part number) for the two spacers or washers beneath the trigger screw (#16) or, for that matter, the pin that secures the “spring holder” (#20). To me, the drawing looks like something that might have been drawn up by a junior-high-school kid on a classroom computer.
A poor-quality exploded drawing is not unique to the Remington Model 5’s owner’s manual; many of the schematics that accompany present-day firearms made by offshore sources are equally bad. I’ve seen some totally unreadable ones packed with guns made in Russia, and I’ve been told this is because the manufacturer believes an exact copy of their product can be worked up from a schematic. Perhaps, now that this Serbian rifle comes in a box that says “Remington” on it, such an annoying detail will be corrected.
On the (somewhat) positive side, I managed to secure another schematic from Remington that—while not much better—at least made it possible to complete this article. The drawing is still crudely rendered and fuzzy, and there are still parts missing, but at least the part numbers are readable.
Field Stripping the Remington Model 5
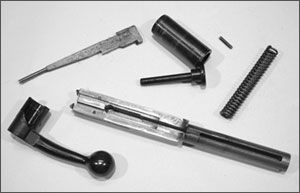
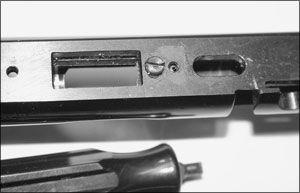
When it comes to simple field stripping, the Remington Model 5 could arguably lay claim to being the simplest. First, however, make sure the gun is unloaded with the magazine out. Depress the magazine button (#37) and remove the clip (#3). Two things hold the trigger guard (#36) to the stock. The forward one is a machine screw (#38), the rearmost a wood screw. Don’t look for them on the schematic. They aren’t there. You only have to back out the machine screw in order to lift out the barreled action. Unless you turn the stock upside down or completely remove the trigger guard, the part identified as the distance bushing (#39) will remain in place.
The bolt is removed with the safety in its “fire” or forward position. Raise the bolt handle, hold back the trigger, and pull the bolt from the receiver. The rifle can be cleaned of any accumulation of fouling at this point, and you can give it a close visual inspection for quality. I believe you will be, as I was, favorably impressed.
Detailed Disassembly of the Remington Model 5
You’ll need a medium hollow-ground and a very small screwdriver, a nylon bench block, as assortment of Starrett drift punches (or an acceptable substitute) and—due to the poor schematic—a magnifying glass and considerable patience.
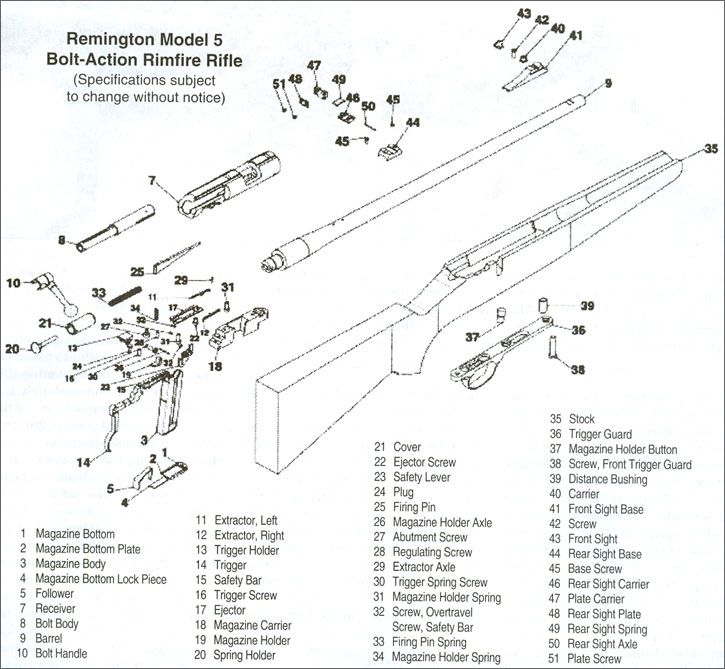
When you removed the bolt from the receiver, you uncocked the bolt and relieved the tension on the firing-pin spring (#33). Rotate the cover (#21) to align the holes on both sides with a pin (not shown). Push out the pin with a suitable diameter punch, withdraw the spring holder and firing-pin spring, and move the bolt handle all the way to the rear. Push the firing pin back in its slot until you can tilt up its rear end and remove it from the bolt body (#8).
Take note of the lug on the bottom of the firing pin (see photo). This is the only portion of the pin that contacts the trigger (#14). The Model 5 is striker-fired. When the trigger is pulled, it drops away from and releases the pin, which is then under tension from its spring. The spring expands to push the pin forward and impact with a chambered cartridge. Any work you perform to smooth up the pull would involve stoning and polishing the trigger/firing-pin contact points—without altering their engagement angles. Additional smoothing, along with a slightly faster lock-time, can be achieved by polishing the inside of the bolt body, the sides of the firing pin, and the sides of the trigger that contact the receiver.
The left and right extractors (#11 and 12) are held in the bolt head by two pins, both identified as the extractor axle (#29). These pins drift from the flat on the underside of the bolt to its top. Take note that among those parts not shown or listed are two extractor springs. There’s one for each extractor. Be careful not to lose them when the “axles” are taken out.
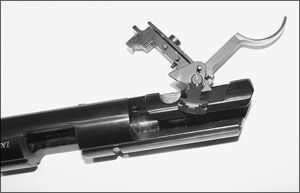
This brings me back to the receiver and what’s attached to it. When you first see the trigger group and magazine carrier (#18), the blobs of red paint on multiple screws will hit you right between the eyes. Don’t be concerned. It isn’t red LokTite, but a far less severe compound that has been dabbed on the screw slots during final assembly. Any disturbance to the blobs tips off the factory repair people that the mechanism has been acted upon by outside forces and specified settings may have been compromised. In plain English: “Someone’s been messing with this gun.”
It’s not shown or identified on the drawing, but there’s a screw that secures the front of the magazine carrier to the receiver. Choose a hollow-ground screwdriver fitting that screw snuggly and back it out. A second screw (#31) is hidden beneath the magazine holder (#19)—which most of us would call a magazine release—and its spring (#34). The holder is attached to the carrier by a pin (#26). It’s a very small pin, which requires an equally small-diameter punch to start it out left to right. Once the pin protrudes about 1/8 inch from the right side of the carrier, grab it with smooth-jaw pliers, and pull it out. The holder (release) and spring can then be lifted away to reveal the second screw. To remove it, use the same screwdriver you used on the front carrier screw.
The trigger and safety lever can now be pivoted upward for further study. They are held together by the trigger screw (#16), which is really a .154-inch-diameter pin reduced and threaded to .118 inch at one end. It’s in regard to the safety lever that the two washers/spacers missing from the drawing become a factor. What they do is position the tab of the safety lever to slide into its cutout in the receiver without binding. At the same time, the oblong slot in the tab engages the nipple on the safety (#15) to lock the trigger.
With these last elements in plain sight, I call to your attention to two very small set screws (#32) in the trigger body and the abutment screw (#27). The latter retains the safety and can be turned in or backed out to stiffen or ease the movement of the safety. Note: It’s possible to freeze the safety solid by over-tightening this screw. Don’t. And immediately under the abutment screw is one of the small set screws. Never turn the abutment screw in any direction without first loosening the set screw. Once you’ve made an adjustment to ensure smooth travel of the safety and an audible “click” into engagement with the safety detent ball beneath it (also not shown along with its spring), turn in the set screw to hold your setting.
Alternately, you might decide that a modification to the overtravel-adjustment screw (located under the safety in the trigger body) is needed. The rearmost of the set screws must be backed off first. After the adjustment is made, secure it with the set screw as you did for the abutment screw.
A few words about those baby set screws: Don’t back them out all the way. I didn’t have a magnetic screwdriver small enough to engage their slots, and getting them started back in the trigger body was one royal pain.
Conclusion
Reassembly is in reverse order. No problems will be encountered compressing springs; this is, after all, only a .22. Now if we only get the Remington folks to order a total redo of the schematic….


