


")


If this hasn’t happened to you already, it will before long. Someone is going to bring you a gun that needs a firing-pin replacement, but the pin will be missing and the part won’t be available from any of your sources. You throw up your hands in defeat, turn the job down and go back to some other project. But let’s not send that owner down the road quite so soon. The case of the missing firing pin is more easily solved than you may think by applying some fairly simple solutions I have picked up in my years of gunsmithing and mechanical design engineering.
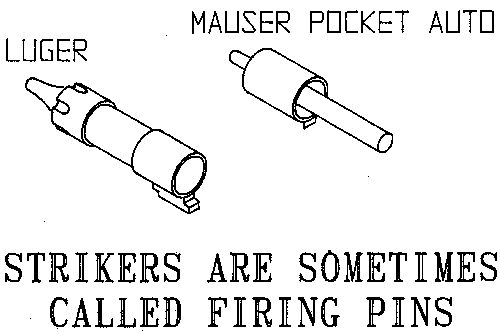
There are some caveats we need to get out of the way at the beginning. If you discover that the firing pin is the striker type, take the job only if the pin is available from your parts sources. Only a very experienced gunsmith, one who is also a good machinist, can make a good striker. We will look at the difference between a “regular” firing pin and a striker very shortly.
When someone presents a basket case, I start by checking the catalogs to see if the part is readily available. Your findings in the books often may be inconclusive because some items may no longer be stocked by the new parts houses but have yet to make it to the used parts dealers. I don’t always want to take the time to call my sources even if it is during their business hours. I sometimes would rather consider whether it would be easier to make the firing pin than to wait for a replacement one.
If the pin is available, checking your assembly/disassembly books will give you an advantage in estimating the job’s worth. I always drop in the caveat that any difficulties with worn or otherwise damaged internal parts could affect the time and price of the job. I rarely find anyone who takes a dim view of this, as it shows them that I am approaching the job with proper caution and some hard-won experience. This is the same precaution that auto mechanics must take, as internal parts aren’t always predictable.
In situations where the part is unavailable, the books—especially the ones that might have that firearm’s pin clearly depicted—will still come in handy. The first to check are those with exploded views I can show the customer so that he can see all of the parts that must be removed so the pin can be replaced, as well as the complexity of the pin itself. Even the most rudimentary drawing can tell you the pin’s relative size, whether it is a single piece or several pieces, if it has a retaining pin or screw, and if it works in conjunction with a return/rebound spring. All those will influence the design and dimensions of the pin. This also give you a preview of the job before giving a price, and the same caveat(s) listed above should still apply.
Should you accept the challenge of replacing a phantom part, gather all the information that may be available from the owner. Even finding out how the part might have gotten lost can sometimes save a lot of time and design effort. If the part was lost without their having disassembled the gun, even to the extent of removing a single screw, you can more easily visualize the retaining method employed by the designer of the gun.
If the firing pin obviously was not exposed to the outside of the gun, then the chances of its “falling out” are greatly diminished.
Firing pin design isn’t all that difficult but it is the sort of thing that a person very new to guns should leave to those with more experience. However, with a thoughtful approach, any person with average intelligence should be able to make a pin that works or know when he is getting in over his head.
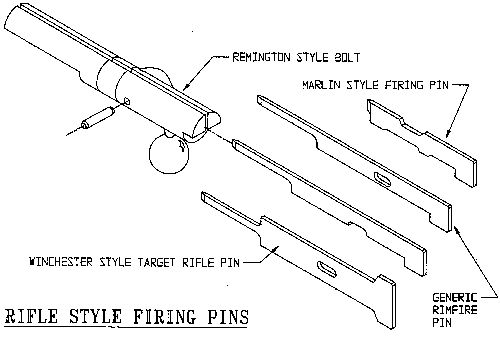
That said, one of the most important features on a firearm that will help you design a pin, without having seen it, is the channel, hole, or whatever it fits and operates in. If the gun doesn’t have a hammer, there is a hole with a side or bottom opened, and there is a sear visible in that open channel, then you can start thinking about the design as having a striker.
The presence of a hammer, without an obvious hole for holding a firing pin, will assure you that the firing pin is a passive one, and captive at that. Next we need to see if the firing pin hole has any of the following: A small, unthreaded, cross-drilled hole that intersects the main hole on a tangent; a small, threaded hole that intersects the firing-pin hole about even, vertically, with the centerline of the hole; enough room to contain a rebound spring at the front of the firing pin hole, and also allowing enough motion to fully retract the firing pin past the breechface.
Finding the mouth of a firing-pin hole threaded, will be a tip to you that there was a threaded firing-pin retainer responsible for keeping the firing pin from falling or being sprung out of the gun. This is just another part to make, although it will call for a lathe and some tricky thread cutting as you will have to make it to fit and won’t be able to take the retainer out of the lathe until you are through with the threading. The necessity of having a lathe will rule this out for most starting gunsmiths.
Going on with repairing the pins, a broken firing pin with a sharp shoulder in the front usually indicates that there was a fine return spring around the nose of the firing pin, and there needs to be room left for the return spring when the new pin is made. If the remainder of the pin goes into the hole and is about as long as the hole is deep, then there must have been some kind of retaining mechanism needed. We’ll explore the retaining methods later in the article.
If you can make the retainer, see if you can get a hint from any picture of the gun as to what it should look like. In the event it cannot be found, always make it as unobtrusive as possible. It may have to be made flush with the rear of a receiver as possible so it won’t get hit by a hammer. If this is the case, put a screwdriver slot in it to aid installation and have it bottom in a counterbore. This will also indicate that the firing pin most likely had an extension with a smaller diameter to stick through the retainer and get hit with the hammer.
Some owners want a firing pin fixed quickly, and I find that quite a few types can be chucked in the lathe, drilled slightly, and a roll pin or small piece of drill rod can be silver-soldered into the hole. This will suffice for a quick fix if the front of the pin is blended to a rounded shape.
When it is determined that a certain pin is unavailable and there is no picture to look at, then it is up to the gunsmith to figure what physical features are needed and what the pin that fills all of these needs has to look like to do that. Again, if it needs a striker, I suggest going to a little more trouble to find it on the used parts market.
If you decide to make the pin, the next step would be to examine the area where the pin will reside. Diameter of the hole, depth to the second and smaller diameter, and method of retaining the pin in the hole top the list of things to measure. While it’s possible to do this without dial calipers, a good set and maybe some small hole gauges, would speed up and make the job more accurate.
If the pin hole has a smaller hole intersecting it perpendicularly and off-axis, then the firing pin must have a depressed or milled out area for a cross-pin to work in. It is possible, though uncommon, for the crosspin to orient the firing pin for a hammer strike that’s not square to the axis of the pin.
With a lathe, first turn the nose end then move the rod stock out further exposed to turn the major diameter. Most firing pins are small enough in diameter that turning the smaller nose after the major diameter is turned might cause the pin to flex away from the cutting tool making the diameter inconsistent. This is not necessary if the lathe has a very good chuck or if the gunsmith is a pretty good machinist. If you are a fairly good machinist, then you will probably not need this article to help you design a phantom pin.
In the absence of a lathe, I have made pins on a drill press by turning the rod stock at a good clip and filing the material off. A stop collar around the rod will help you obtain a good, sharp ledge or step, where necessary. Any finish work on the pin can be done with the same setup and an abrasive stone. It’s a little labor intensive but there is no reason you should be unable to make a first-rate firing pin that way.
I usually make the diameter of firing pins about 0.002 to 0.003 inch smaller than the firing-pin hole, but may have to lap some to fit. The diameter of the firing pin’s main body is generally more critical than the size of the nose. The body provides the main guidance for the whole pin; the nose only has to ride along and stick out far enough to set off a primer. I always make each end of the pin about 1/10 inch longer than I think it should be and file it down after the job is 99 percent finished. The tip end of the nose is radiused by holding it against a Scotchbrite wheel and rotating it for a couple of seconds. This puts a good hemisphere on the end.
Making the clearance for the crosspin, if needed, should be done as a secondary operation after the main pin shape is cut on the lathe. A milling machine is best for this but it can be done successfully with a file or a Dremel tool. I suggest the beginning gunsmith use a good, fine file, which is forgiving and makes the mistakes more recoverable.
After all its shaping is done, the entire pin should be smoothed with a very fine hand stone or a ScotchBrite wheel on a bench grinder. Be aware that almost no material should be taken off that will affect the fit of the pin. For this reason, I make the pin fit tighter than I want to end up with, then polish it to fit the hole better. This takes practice. Fortunately, firing pins don’t have to have a liquid-tight fit like other parts made by a machinist do. They just have to ride in a hole in a reasonable fashion and hit the primer within a fairly loose area.
The final item to address in most firing pin jobs is the rebound spring, if one is required. An important thing to remember is that a firing pin needs only a slight amount of force to return to its resting place. There are some firearms that need a slightly stiffer spring to insure that the pin doesn’t strike a primer if the weapon is dropped. You will have to use your judgment where the pin is obviously intended to act as a safety device. This is not the case with most shotguns nor is it necessary on firearms with hammer transfer bars or hammer-blocking devices. The most common firing pin spring you will need to duplicate will be the shotgun pin return springs found on guns with exposed hammers.
The next important thing to remember about firing pin springs is that they shouldn’t be made to bottom out when the pin is activated. One of the chief causes of firing pin breakage in shotguns, this will eventually cause the nose of the firing pin to just keep on going when the body of the pin is violently stopped. The same applies to Luger pins but the spring isn’t the cause; the front of the pin takes the blow. I also make the relaxed spring lengthy enough to hold the nose back from the breech face but not far enough back to have the nose all the way out of the breech’s firing pin hole.
In most cases, the rear of the pin should be chamfered slightly, to keep an edge of the rear of the pin from ruining the hammer and also to keep it from getting deformed. If the pin is too hard, the hammer will either form the rear of the firing pin, or it will be grooved by the pin. I prefer the pin to be smoothed at the rear so that I won’t have to replace a hammer. Polish the chamfer with the ScotchBrite wheel, if possible.
The nose of the pin should be left as the drill rod came to you, and the rear should be hardened somewhat if the pin is hit very hard by the hammer. I use Vise-Grip pliers on the front of the pin to sink the heat away, heat the rear rapidly, and quench it before the heat has time to spread to the front. This gives a good temper to most firing pins.
There are times one has to get into the firing pin’s place and analyze just what the pin has to do and put metal on the pin in the place to do just that. If there would be an interference at a certain point, then remove just enough metal to eliminate that interference. You’ll be surprised how easy it is to figure out what is needed if you just put yourself in the missing pin’s place.


Need firing pin for 12 gauge shot gun Toreador brand
I have an Old English 12 gauge shotgun side by side make r emsley I need a thread in firing pin thank you