


")


It’s safe to say that Marlin’s Model 60, a tube-fed semiautomatic .22 rimfire rifle, is among the most popular on the market today—and possibly among the most favored in history. After all, when a model has sold nearly 3 million copies over a 30-year period, something has been working right.
Like any product with such a long service record, this Marlin has undergone a number of revisions. Some of the changes have been cosmetic in nature, some have been significant improvements, and some appear to have been driven by cost-control efforts. The Model 60 has been offered in a variety of configurations and under several different names. It has also enjoyed success among the private-brand marketers. Companies like Montgomery Ward (Western Field Mod 50), Coast-to-Coast, Cotter Company, J.C. Penney (Foremost), United Merchandisers, and OTASCO have all sold some version of the venerable rifle.
All the parts are interchangeable between the private-label and Marlin versions.
The Marlin Model 60 is not a glamorous rifle, doesn’t retail for a fortune, and gets used, abused, and neglected. It has never gotten as much attention as the Browning Auto 5 or the Winchester 94 rifles. Most of the general information here also applies to the less popular magazine-fed versions.
Design Changes
As mentioned above, Marlin has made a number of design changes in the 1960 version of the Marlin .22 Auto which affect gunsmiths. These design changes need to be identified as the evolution of the rifle is brought up to date with modern parts.
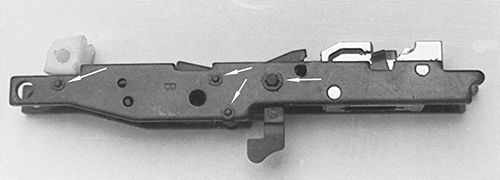
Three major changes were made on the rifle’s feed throats. The original one in 1960 incorporated the ejector as an integral part of the feed throat on the upper right side of the assembly. The unit was made of heavily plated die-cast metal. New assemblies are made of the same material, but having tried to file the new feed throats and seeing sparks produced from grinding, it may be that some feed throats were made with steel or other metals.
The original feed throat concept was excellent. However, after years of constant use and being struck by thousands of cases, the pot-metal ejector tips began to batter and lose their square edge. This allowed empties (and live rounds) to ride over the top of the feed throat’s integral ejector, resulting in serious jams. In 1976, this malfunction had become so critical that Marlin changed the original design. The ejector was removed from the feed throat, with the tension end of the lifter spring now acting as the ejector. This change necessitated replacing three parts—the feed throat itself, the lifter, and lifter spring. These parts were sold as a set.
This feeding system worked well, but in 1980 Marlin changed the bottom contour of the breech bolt and was forced to modify the feed throat to fit. The original breech blocks and feed throats were angled, and are found on rifles made up to 1980. The Gun Control Act of 1968 forced Marlin (and all other manufacturers) to serial-number their products. Those rifles manufactured before the law required serial numbers could no longer interchange feed throats with newer models; a change of both the feed throat and breech block was now required.
A bit of gunsmithing can make the newest parts work in the older versions by simply milling, grinding, or filing off the right top edge of the new square feed throat until it matches to old breech-block configuration. The breech block must just slide over the top of the modified feed throat without contact. This will save your customer the cost of a new breech block, and if the savings are properly explained, develop some super customer relations and good will.
At the time the breech block configuration was changed, the hammer assembly was also redesigned. If any hammer parts need to be replaced, the new-style assembly will have to be ordered.
At least three major changes have been made to the stock and trigger-guard designs, each involving physical dimensions of inletting and the methods of attaching trigger guards. Marlin indicates that no factory stocks are available for any version of the Model 60 except the one in current production. If a stock or trigger guard is needed for an older gun, both the trigger guard and stock will be needed. It is important to recognize that none of the trigger guards will interchange with stocks that fit other style trigger guards or vice versa. Even custom inletting an older trigger guard into a newer stock will not produce professional-looking results.
To help determine what stock version is on hand, the original configuration had two screws at the rear of the guard, one to hold the guard to the stock and a bolt to hold the stock to the receiver. After Marlin decided two screws were unnecessary and more costly, a change of guard design and stock was made in 1981 to accommodate a single rear guard screw. The newest version is wider than either of the other styles. It also has a cutout on the right side to accommodate the hold-open device—a worthwhile improvement added in 1984.
Another area which has been revised is the front sight and front magazine-tube hanger. The original version had die-cast loops held in place with a small set screw. The top loop contained an integral front sight. The bottom loop supported and pinned the front of the magazine tube in place. Recoil, however slight, loosened the loops. These would move about, prompting the design to be changed in 1975.
The new-style magazine-tube band is made of steel, and is dovetailed into the barrel. The front sight, integral with ramp base, is now screwed to the top of the barrel. A change in the inside magazine tube occurred at this time. The addition of a spring-loaded collar on the front of the tube was added to help keep the inside magazine tube from unlocking.
A change in the attachment method of the sideplates to the receiver was made in 1980, a few years before the addition of the hold-open. The original method used two front assembly screws, an assembly post, and assembly-post screw for the rear. The latest version has eliminated these parts. The rifle now utilizes a tongue-and-slot method to hold the front of the sideplate assembly in its correct position with the receiver; a split plastic rear-assembly pin retains the back. Needless to say, this version will not work on older guns.
Other than these changes which the gunsmith should be aware of, the basic straight blowback concept of the rifle has remained constant over the years.

Problems and Solutions
The most common complaint gunsmiths hear about this rifle from its owners is “It doesn’t work,” or similarly detailed information. Armed with that knowledge, it is up to you to determine the problem and solution.
The first step is to remove the stock. It’s not necessary to remove the front guard screw for stock removal, as its sole function is to secure the front of the guard to the stock. Having lost the owner’s manual and instructions, the customer may have taken the front guard screw out, and, as a result, the front guard nut is no longer retained. When the stock is removed, this nut (which looks like a collar button) may fall out and become lost. Carrying replacements in stock may not be a bad idea. Remove the rear guard screw first, then the large-headed screw found just ahead of the trigger guard. Leaving the rear screw in place when trying to lift out the barrel and receiver could result in a broken stock or trigger guard.
After removing the stock, it will usually become apparent why your customer is having problems—most often dirt, and lots of it. Thick, oil-laden powder residue and dirt can become so heavily impacted in the internal workings that free motion of these parts is restricted. Obviously, this calls for a thorough and complete cleaning. Foreign materials like sand, powder fouling, oil, twigs, leaves, and an occasional feather will be discovered in the actions, all contributing to dirt malfunctions.
Remove the sideplate assembly by removing the front assembly screws and rear assembly post and screws, or by removing just the rear pin and lifting the sideplate assembly out of the receiver. Then place this assembly in a solvent bath to soak overnight. (Speaking of solvents, hydrocarbons, trichlorethylenes, and sprays containing them are not especially good for one’s health and could trigger unpleasant long-term health problems. Other solvents, like Gunk or Eliminator, are just as efficient, and if employed within factory prescribed conditions, are certainly safer.)
The breech bolt is now pulled back so the extractors clear their cutouts in the barrel. Lift the bolt out of the bottom of the receiver, allowing the pressure of the recoil spring to release slowly, taking care to keep the recoil spring and guide from escaping. The charging handle, breech bolt and guide should join the sideplate assembly overnight in solvent.
The receiver should be cleaned, as antiseptically as possible. A pick can be used to great advantage to get into crevices around the barrel and extractors. Scrubbing the inside of the receiver with a toothbrush and solvent will help with this cleanup. Continue to clean and flush until the solvent shows no discoloration. The bore should also be brushed and cleaned until patches show no lead traces, then lightly oiled. Receivers are anodized and the black color is resistant to cleaning agents. However, some have been known to shed their color in some stronger solvents, so don’t dunk and soak the whole receiver to clean it. And don’t forget to clean the trigger-guard assembly too!
If a water-soluble cleaning solution is used (such as Gunk or Eliminator), loosened dirt in the guard and breech bolt can be easily flushed away with a forceful stream of water. The parts can either be air dried or submerged in the solvent again to dissipate residual moisture and then drip dried. Make sure the parts are clean and show no traces of dirt residues. Used solvent will contain dissolved oil, and as the parts dry, a thin film of oil may be left on all surfaces. As these parts are internal and not subject to being handled, this thin film may be sufficient to preserve them. Nevertheless, a light spray of gun oil will afford better rust insurance.
Courtesy
If all the parts appear to be in good condition, reassemble the rifle with a new recoil spring. The old springs have a habit of collapsing enough to make the rifle function unreliably. In this instance, it is better to charge a few bucks for the spring and explain why.
If the rifle ejects and reloads, but does not fire reliably, a weakened or bent recoil spring is probably the cause of this malfunction. As the bolt slams forward against the breech, it bounces back much like a hammer bouncing off an anvil. A weakened or bent recoil spring may not have enough push to fully reseat the bolt against the breech. If the bolt is not fully forward, the disconnector may be held down, preventing the trigger sear and hammer from functioning. If the rifle clicks and does not fire, the firing pin may not be reaching the case rim. In either case, the weak or bent recoil spring is probably the cause.
One way to check the length of the spring is to mark the length of a new factory recoil spring along the edge of your workbench. It is a quick and simple way to measure the old spring against this factory standard. (This idea works with any spring that is subject to weakening.)
When replacing the recoil spring, clean the whole rifle; it probably needs it. One method of reassembling the spring to prevent it from kinking is to insert the recoil spring and guide into the bolt, using the fingers to direct the spring into the bolt and pressing the bolt over the guide. This will keep the spring straight. Ease the bolt down into receiver until the extractors are resting on the breech, insert the charging handle, and position it in its recess in the bolt. The bolt can now be seated in the receiver. Just a light spray of oil for lubrication and preservation will be sufficient. Anything more will just allow powder and dirt to build up more rapidly. Test fire with a full magazine. Chances are the rifle will work just fine.
A common problem that is easily corrected on the newer versions is failure to eject. The cause is a malformed band in the tail of the lifter spring. Simply bend the spring up until it just clears the bottom of the bolt. It may also need to be adjusted slightly inward to ensure that it will contact the case base. These adjustments can be made without disassembling the rifle.
If the ejector is built into the feed throat, it will be an older version and a new feed throat is needed. The insertion of a paper clip in the hole in the hammer strut will hold the hammer assembly (retainer, strut, spring) as a unit when the hammer is uncocked, preventing an explosion of parts when the sideplate is removed. When removing the small “E” clips on the right sideplate, set them aside carefully or stick them on masking tape—they’re easily lost. Next, remove the right sideplate, then remove the buffer and inspect it for breakage or cracking. Take out the old feed throat, lifter, and spring.
To reassemble the new unit, insert the lifter into the feed throat with the front tab down. Place the ejector/lifter spring over the large pin and install the lifter on the hammer pin. Now position both lifter spring arms to extend out the top of the sideplate assembly. There will be no tension on either the feed throat or lifter as they are assembled on the sideplate. If the rifle is the hold-open model, the hold-open will be loose. Make sure the coil spring (held on the sear pin inside the pivots) is hooked to the lower (inside) stud. Position the hold-open in the right sideplate first then pull the plate forward to position over the other pins. Press the right sideplate down and install the pin rings. Now hook the lower arm of the lifter spring under the lifter. A tool can be made by cutting a notch in a small screwdriver blade to keep the spring from slipping off the blade during assembly. Position the other end of the spring in its notch in the feed throat. Cock the hammer and remove the paper clip. Reassemble the rest of the rifle and test fire.
Even though the firing pin and extractors seldom cause problems, it would be wise to check to make sure the slender tip of the firing pin and extractor hooks are not broken.
It is a good idea to look at all the parts and to check to see if the disconnector spring is sprung. The coils should not be spread and the legs not bent except at the very ends. Also check to see that there are at least four “E” or pin rings in the bag. They will need to be in place after reassembly. The hammer assembly is also likely to be in a disassembled state. The spring retainer has notches cut on the top edge; the long cutout goes to the top right to allow clearance for the disconnector. Be sure it is installed correctly on the hammer strut before proceeding. Install the disconnector spring to the disconnector, then lift the lower leg of the spring up to drop into the retaining hole on the left sideplate before assembling the disconnector to the sideplate. If the disconnector has not been removed, it is important to use care in assembling the spring. Check the disconnector to see if it will snap up after being pressed down. Before slipping the hammer assembly into place, assemble the sear and sear spring with the pronounced “V” portion of the spring up and in the forward inside portion of the sear. Make sure the hammer is seated between the prongs of the disconnector, then raise the bottom leg of the sear spring to fit through the sear-spring tension hole in the left sideplate.
Trigger pulls on the Marlin 60 are spotty, tending to run on the heavy and creepy side. The trigger pull on the rifle used for this article actually cammed the hammer to the rear before releasing. The judicious use of a stone on the sear can significantly alter the pull, though any alteration to that part may void Marlin’s five-year warranty. If carried to extremes, it could lead to multiple discharges.


